I have been missing in action! Good News! I am now retired, which should give me more time to craft and blog! Todays blog is about a problem I had….it was solved so simply….

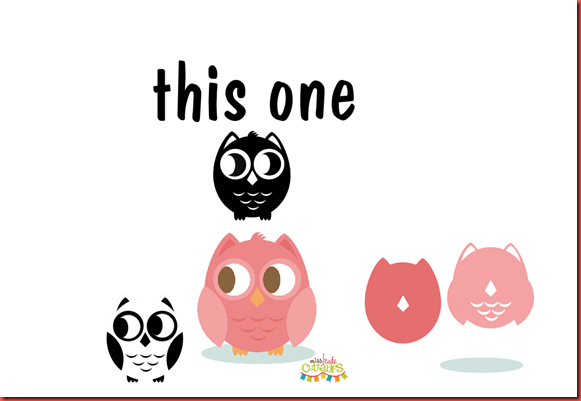
Here was my problem. I downloaded this Free to Craft Room Members, darling Owl, in the Pazzles Craft Room.
Then, I took all the pieces I wanted to make a 1 layer Owl.
I wanted to use only one color. The white parts, I wanted to weed out, so that the cup color would show through.
This part was simple enough….
2
Until I looked at WireFrame View.
From Menu Bar Select:
View | Wireframe
Notice how I had a hard time lining up all the cuts?
Hint, look at the ears for example…well, I knew that would be a mess when it cut…
Look at the eyes, I did NOT want three cuts…
So off to welding I went

3
From Menu Bar Select:
Tools | Welding
Well, it fixed the extra lines around the ears and other places…
But the eyes! YOUR KIDDING ME!
I Lost my wings! LOL In more ways than one! LOL
That just WOULD NOT work!
Thank goodness for UnDO!
I took his eyes out and welded them separately…
I was ready to poke his eyes out…
Really needed this Owl…

4
So, I sent the file to Klo and she demonstrated how to fix this
Happy Dance!
5
She really is the MASTER of KISS (Keep it Simple Sweetie)
6
Select the owl

7
Choose W.Y.S.I.W.Y.G.
Otherwise known as
What You See Is What You Get
(That is for those that are my age)
Or from Menu Bar Select:
Shape | WYSiWYG Cutting Transformation
Your mouse pointer will turn into a little "clog"
Click on the Owl


8
Well, I have no idea…but, this is just me, High must be better, so I choose High…
Have no idea what the bottom check mark is for, however Klo did not choose it, so neither did I

9
Hum, for a week, many hours I fiddled with this owl….Klo showed me how to make the dern COMPUTER do the work, instead of me…
I swear, the computer only took a minute to do, what I could not do in oddles of hours!

10
Then two of these birds showed up.

11
This is what they look like in WireView
That’s that "W" Icon at the bottom of your screen, or
From Menu Bar Select:
View | Wireframe
Yep, I was SOOOOOOOOOOOO Happy to delete the one on the left, with glee!

12
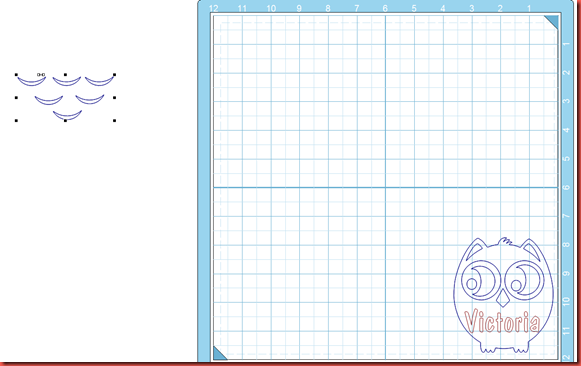
I gathered up all the feathers and grouped them
Hold down your shift key and select each feather one at a time…
Drawing a box around them did not work for me . . because the outside of the owl got in the way..

13
Then after you have all of them selected move them somewhere outside of the owl
14
While they are still selected, choose
Shape | Group
Now that is out of the way, time to put the name of the person receiving the cup!

15
Choose Type

15
I choose a Pazzles font.
You don't have to…
But, I wanted simple and easy. Pazzle fonts cut WAY easier and I wanted something quick and easy as I was worn out working on his eyes!
Not wanting to poke his eyes out any more…

14
Sized the name to fit into the Owl
Selected the Owl
Control G to group
Or from Menu Bar Select:
Shape | Group

15
Size the Image
Select the image
Right click
Choose Height
Or….
Just select the image and type an H

16
For my water cups, I know the image can't be higher than 4" and I know the width can't be more than 3.5
So, I type in a 4 and choose apply
Perfect. This made my Width go to 3.157 :)

15
Ready to Cut!
Oh, I have a yellow stick up on my monitor that says "Do not cut until you check these things"
1 - Check Wireframe - Make sure those are the lines you want to cut…see, this is where I got caught in step number 2 (thank you post-it note) Did not waste any vinyl on a bad cut.
2 - Do I need to weld? Yeppers. I am an expert on welding now, I welded this Owl every way you can imagine.
Welding did not work in this situation.
WYSIWYG is a better choice in this situation.

16
3 - Any Sharp Points? If so, I round them up. In this event they were all good. I turn on Construction Points and make sure I don't have millions of nodes. If I do I remove them.
That’s the C Icon right next to the W icon on the bottom of your screen

Ok, right here, let's talk about this. Construction points, are those little white boxes all over the place.
For right now, I want to tell you, I about ruined my pazzles when I first got it. Turned it on copied clip art off the internet and sent it to cut. Machine started up and just cut in one place…
Wonder it did not blow up
Years later (a few weeks ago) I decided that since I was retiring, that was one thing, I wanted to learn how to do well. Operate my Pazzles and my Software. Well, it would not cut good. I opened a new mat and prepared it. (had to review the video on http://www.pazzles.net/wordpress/videos/fundamentals)
I put in a brand new blade (again referring to videos above)
I updated my machine and my software and tried again (yeppers videos for that to)
Double checked my blade length and pressure…
Nothing worked….
Then I seen this video and thought, what the heck
http://www.pazzles.net/wordpress/2013/06/25/maintain-your-creative-cutter-for-best-performance
My gosh! My machine worked perfectly! When I cleaned the blade..I was shocked…there was paper shoved up in that hole! I mean, it was packed in that hole! Under the rollers I had had enough paper to make a card…well not really, but WOW!
While I was removing this dirt, grime, paper, glue from my machine that was HARDLY USED, I thought back, about cutting that thing that made my machine cut in one place….I bet, I did that when I first got it..I just bet that is when it happened…I am sure that the few times I used it I messed it up…you see, I just have a habit of jumping in and read later.
Really did not like the machine, no really. Liked it WAY better than the cricut, like way better. But, would rather, get out my punches and dies than to mess with the time it took me to cut one thing. Because it would usually mean I would have to fiddle with it and cut it over and over, just to get the paper up, cut crisp lines and then, usually have to finish the cut with scissors.
And NOW! It cuts like butter! Who would have thought? Eh?
Love it so much, ordered the VUE!
Sorry rambling..

17
4 - Paper size - Yep, this will save your vinyl or paper…
Verify that you have the correct paper size prior to cutting
I like to work, without the page showing or the Mat.
Here is where you turn them on or off from showing up on your screen
View | Page
Photo to the right shows the page turned on.
As you can see, I don't even have my image on the paper….
I only need a 4.5 square piece of outdoor vinyl for this cut

18
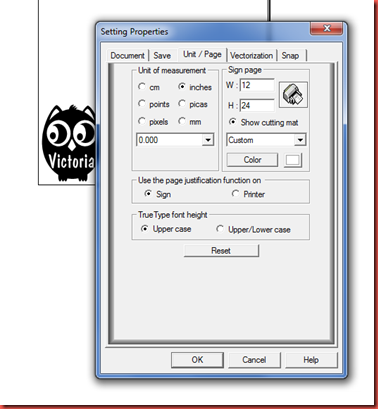
Ok, now let's check to see if the page size is correct
Setting | Page
Nope
I am not using my 12 X 24 mat, so I fixed that
I like to see my cutting mat, so I checked that.
19
This defiantly will cut on a 4.5 X 4.5 square piece of outdoor vinyl.
I purposely placed in in the lower left hand corner, because I alternate where I cut on my mat, so it lasts longer…
When I place my vinyl on the sheet, I made sure I put the paper side down to the mat and the vinyl side up.
Make sure NO bubbles exist. I use a credit card sort of thing and smooth out the vinyl making sure all winkles, bubbles are gone.
Make sure the vinyl piece is stuck down real good. If it is not stuck down real good, I use painters tape around the edges so it won't slip.

20
Last but not least TEST!
I added guide lines, since I was using a scrap, to made sure I knew where the vinyl was on the sheet
To add guidelines, you just double click on the ruler when they appear, you just select it and move it to where you want it to go
Then add your test circle
Draw | Circle

20
Choose Cut Project

21
This setting works for me and my machine and the vinyl I use.
(now I don't know how to make that picture show a 1 1/2 blade, so I added it in the description)
Select just the circle
Choose cut project
Here is what you are checking for:
Did it cut the circle correctly?
When you cut vinyl, you cut ONLY the vinyl. Lift up the corner and verify that the paper is NOT cut! You should not see a circle on the back side of the "vinyl" (Vinyl is on the top, and a paper is on the bottom closest to the mat)
I repeat this process until I find the correct setting. Now, I only do it once, because I know my vinyl is the same and it works every time so far. When I find the correct setting, I choose "Add Media" and I add it, so next time I do Vinyl (outdoor) I know to set my blade at 1.5 with this "saved setting"
That’s all there is to it.
There are lots of video's on how to weed vinyl and use transfer tape to place your "sticker" on the cup, or where ever you choose.

Please take the time and leave me a comment! I love your comments and read each and every one of them!
Love my Pazzles!


![01fdfa23579721977569998b63048a66de97[2]](https://blogger.googleusercontent.com/img/b/R29vZ2xl/AVvXsEjG9VMocoNoz-cQRi5GbIRiVJ2lSA_TK_j25tdXKz4HJv_ZnCQ9jyWCxWfaY_zv94J2yscOTShGq7-vgw54e3Gmr4YVcsaOSXb5ATBIV3kCDqflp6T7eN0JLa1Kc6P3DWTMU3kOaUy448Y/s1600-h/01fdfa23579721977569998b63048a66de97%25255B2%25255D%25255B2%25255D.jpg "01fdfa23579721977569998b63048a66de97[2]")
![0187462269055cda4e7d9966c7e4131685cd[1]](https://blogger.googleusercontent.com/img/b/R29vZ2xl/AVvXsEhI_vhnYK9Xtehi4K2sno8kIgB27kHmI9WnMA6mOeQsAaiVYAXqIjf1EF5hBNMws73bJFbgkIWetnxAYCDWb5E55nsL2VR10nYjw_57fqd31clxaJkOKS7-M-B0afBoOHt_FKGhAmd7hJs/s1600-h/0187462269055cda4e7d9966c7e4131685cd%25255B1%25255D%25255B2%25255D.jpg "0187462269055cda4e7d9966c7e4131685cd[1]")


 Posted with Blogsy


![two turkeys_thumb[1]](https://blogger.googleusercontent.com/img/b/R29vZ2xl/AVvXsEiX6fR1zqsxaV-Djcfxn1OLxx_pyooalfi_9m6uUxHlNnJusiPXyO-IJOcWT7xB-fOqLbWiI3x5ufZw9HcpKeu810VWPzBZJ-I51VfbWNGkhBR6BN94kLCRFU1ER4jlXTAkmu5WMVymRqI/s1600-h/two%252520turkeys_thumb%25255B1%25255D%25255B2%25255D.jpg "two turkeys_thumb[1]")
![4 new sizes 1_thumb[1]](https://blogger.googleusercontent.com/img/b/R29vZ2xl/AVvXsEjPTNONOqf1QaddADODrods62IbdD4K6Jh7LEU7OmV_YOZDVEaaJh41BYInAyK2CM4ogKu5g2W0a3RYKD1DQo3NUJs2psRN2RR4uQrUKW3FCVteWwRpILG8huuB7ClDoxIn0kCQdvKAlQ8/s1600-h/4%252520new%252520sizes%2525201_thumb%25255B1%25255D%25255B2%25255D.jpg "4 new sizes 1_thumb[1]")


![4CircleDone_thumb[1]](https://blogger.googleusercontent.com/img/b/R29vZ2xl/AVvXsEi9RnF1QAzOJz1xKTSmXXKW4k52vEQcm8gvMnKno8bztWCOasmNVAh6qsuaasW2MxUUnPig8NC3bGyjsXoZ7edTJSitX4wdvjTkgRZJUNbb0jwkuOugQht5D36QBp98lkFtnzPiLhDV2tY/s1600-h/4CircleDone_thumb%25255B1%25255D%25255B2%25255D.jpg "4CircleDone_thumb[1]")
![Xyron_thumb[2]](https://blogger.googleusercontent.com/img/b/R29vZ2xl/AVvXsEgrIP-STghIDBDikVicIrkWa30Y-5363L5p36MFh8ML_m67dwrJ_DtLMeHsSbHY08YSFR8xleS-TKQRsojE6_xlDWy8-sypSIF72asNSsspZrwrc2QAK_vElHOPqK3isSi9COoVe_m6t7c/s1600-h/Xyron_thumb%25255B2%25255D%25255B2%25255D.jpg "Xyron_thumb[2]")
![turkey body_thumb[1]](https://blogger.googleusercontent.com/img/b/R29vZ2xl/AVvXsEiA-R70YAsUXYn99q6iPJlX0ltOu_AHR3zLPbI7QZ9Mese5EhL7rVD7aJRpkgjMgSkFA8KTA2xr9oOmk3UJzIsok9e7xecT8YTg2sE7x5-Okss6wjxXfNbctJB1WO5JNWORwuuhYUFH81s/s1600-h/turkey%252520body_thumb%25255B1%25255D%25255B2%25255D.jpg "turkey body_thumb[1]")
![Done3_thumb[1]](https://blogger.googleusercontent.com/img/b/R29vZ2xl/AVvXsEi3QiDrUtLoK69OhF0aNNsALAE76c83EQ3Hh1c7412mdSNhA-BKcQRl9Z4Dhx47YJa4kjZ7qds4fiI0iDkjRGp6je29r5ufo0BZqj0zzNqk-S9wTWtcZYBgnYZVt8pFeibuU9MdJwNXFAU/s1600-h/Done3_thumb%25255B1%25255D%25255B2%25255D.jpg "Done3_thumb[1]")
![ConnectTurkey_thumb[1]](https://blogger.googleusercontent.com/img/b/R29vZ2xl/AVvXsEhPho8CSLb8RQvBISNfUvLnx8a19a-VEJU1Cc_OXcp2oHhXm9vEKdBXExXqtXkyonOLSjpdTEpmwth9aqbIrBAOSqFjvkK1LAQw2tYtNk8D38CAphKeXxfNP5h_cpgPzlK2q7-CFJ8PNAA/s1600-h/ConnectTurkey_thumb%25255B1%25255D%25255B2%25255D.jpg "ConnectTurkey_thumb[1]")
![Done3_thumb[3]](https://blogger.googleusercontent.com/img/b/R29vZ2xl/AVvXsEgOproO3hVZX756_iRq4_14Eltt0LyOWcJYguQ2CNmmxIoakIQa1hx8txD4nt70Sw-VfmvOgqicaFLJaXnzziqmFpAa4EhxetvGzU462uGbcEa_C7922djOKEGnGCcMqteQKWShZx6i55E/s1600-h/Done3_thumb%25255B3%25255D%25255B2%25255D.jpg "Done3_thumb[3]")
![BackEnd_thumb[1]](https://blogger.googleusercontent.com/img/b/R29vZ2xl/AVvXsEgp80tfrlxKLveGsynwIbefZC_3SKmqiD8apeQpTclz75NjBPyoGoeY4TBvXPcHBjUbNIvLqx9aK6EOe8FVqzIW8cOB-u4fJ_dUmo2-ojUud3GLCaYrd71660SduRVecUDJAKOEXye13ko/s1600-h/BackEnd_thumb%25255B1%25255D%25255B2%25255D.jpg "BackEnd_thumb[1]")