![two turkeys_thumb[1]](https://blogger.googleusercontent.com/img/b/R29vZ2xl/AVvXsEg-ZGee_cx0Nzvlb4G6K-YicwR-BjeSGcQeqGMfaJUF-wDgU-hqcIcp6dgu5qWbNLl8z2S9spJOikR8LQutYMKJB0wfzFxSdvKhh6muXFERD2w5dhzMY6XqkoyVypOqXY_O8IzSeCcZX9k/?imgmax=800 "two turkeys_thumb[1]")
This was fun! I timed my second Turkey, and it took me 3 hours. If you make one, PLEASE post on my Facebook page, your turkey! Would love to see it!
If you enjoy this post, Join my blog! I have also added a link at the top right, so that you can subscribe to any future postings.
My Inspiration came from several places. The first time I seen it was on Frenchie's page. She has the best tutorial for making Rosettes. It’s so good, I am not going to repeat it. I learned some great tips from her.
I also seen Tim Holtz’s Quirky Turkey’s. I intend to make these as place cards for Thanksgiving.
I went on a quest, trying to find the template for the turkey body and feet and found it at Archivers. You will want to go there to download the template.
Supplies:
- 7 pieces of DSDP (Doubled Sided Designer Paper)
- Chipboard 1 sheet will do it!
- Ink (I used Walnut Stain - Distress Inks)
- Score Tape or Red Line Tape
- Hot Glue Sticks
- Ribbon
- Sizzix - Tim Holtz - Tattered Leaves Die
- Burlap
Tools:
Prep these items:
3 Each - 4” X 12”, DP
3 Each - 3 1/2” x 12”, DP
3 Each – 3” X 12”, DP
3 Each – 2 1/2” X 12”, DP
8 Each 1 3/4 Circles or Scallop’s (I used my Stamping Up Punch) DP
16 Each 3” Circles (I used a Circle Scissors) DP
1 Each Chipboard – 6” Circle (I used Circle Scissors)
2 Each – 6” Circle DP
Die Cut Tattered Leaves using Burlap
Turkey Body and Feet out of Chipboard
2 Each Turkey Body and Feet DP
Border punch one side of each of the strips, and smudge distress inks over all edges, front and back.
![4 new sizes 1_thumb[1]](https://blogger.googleusercontent.com/img/b/R29vZ2xl/AVvXsEhxhrWzT9Cxu3NmX29AZu__6mSrTNDQmQbIIcCDnmL9LOc6spM3-9e4W8IKX0aV8CCm2fyXlCMj4wPpUJqb4nmP8OSqMPbn0-GD2mF1gE0_NADpqYXKbPQMaMfy2OlRC7tsZrEOyGO87kY/?imgmax=800 "4 new sizes 1_thumb[1]")
Score every 1/2 inch and accordion fold. Each size is going to make one rosette. Attach the three pieces together of the like size with scor tape or red tape.
I completed the three small strips and had to run to do an errand, which means I needed to wash my hands, to get the ink off. Found this cool tool to clean the ink or paint off my hands, so grabbed it.
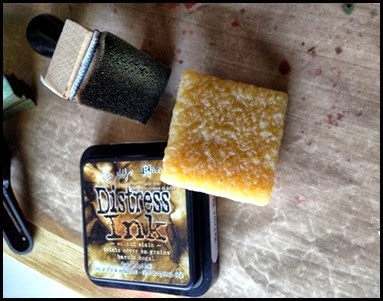
HA! It did not work! I kept scrubbing and scrubbing and it was just useless….my memory is fading. That is NOT a scrubbie, it’s a Adhesive Remover…now, I can tell you, it works AWESOME to remove glue goo, but for a hand cleaner, heck no!


The Scrubbie on the other hand, DOES work! My suggestion, remember to grab the Scrubbie NOT the Adhesive Remover, you know, right tool for the right job..
I love to use Sookwang – Scor Tape instead of red tape, because I can just tear it, rather than grabbing the scissor's and cutting the tape…either one works. Oh and see that nifty little tool that looks like I just picked it up from dentist? A must have, if you have a die cut machine, but has it’s other uses like taking the liner off the scor tape, or the red tape. I love to use clamps when I am making Rosettes…


Assemble your Rosette’s covering the glue with the 1 3/4 Circles or Scallop’s that you have smudged.
Now for the feathers in front of the Turkey. Take two 3” Circles, glue them together, ink them up and fold them in half.
Then glue 4 of those circles together. You will have two sets of “feathers” Remember to ink up the edges.
![4CircleDone_thumb[1]](https://blogger.googleusercontent.com/img/b/R29vZ2xl/AVvXsEiIZ47lKiVRfr19Do4d6BxkwpJfvfLT0Ldk4HKMpThyphenhyphenO8Jwy2cPHspk8ahKtA1ItOXdWmooPgipynYMyCgKs4fzlLw0j4CMSPE6SDqJ1WvhkNMfvlhdVymzeSvjYXswGAnfbWoNNh2_gYI/?imgmax=800 "4CircleDone_thumb[1]")
Cover some chipboard on both sides with Pattern Paper, then cut out a 6 inch circle. I dragged out my Xycrons.
![Xyron_thumb[2]](https://blogger.googleusercontent.com/img/b/R29vZ2xl/AVvXsEg-UitXnNQZYss2TnQJS8JKFyjYETWHRdPtBoWyVWfxMXWcCgomDgGfzxa8onM9S4mp4Z9oS-KccGWKU4VIB5ndRGGm5vMVWP-mJO5We_a5dDSljnQMgC5N2_fv0ggsRTBL5Q7uPKHlWq4/?imgmax=800 "Xyron_thumb[2]")
![turkey body_thumb[1]](https://blogger.googleusercontent.com/img/b/R29vZ2xl/AVvXsEgTICPK4KjFJ0TsSW3JKq89O3GreaOkZnr60Cy04q-kKOTwOPxsOonYFcOAMK_zh7tLgFuXskvGLblVCT9mwbW5HRmhm3T5ki8hliXPwZRHcKXcJkEp2MTK6kRxaNHkoHAZh-VtPB1wUuQ/?imgmax=800 "turkey body_thumb[1]")
Cover some chipboard on both sides and trace out your pattern of the turkey body and feet, cut out. I am DANGEROUS with a craft knife so I used Tim Holtz’s Tonic Scissors.
Smudge up your Turkey body on both sides and the feet on one side. Hint: Look at my turkeys…I forgot to flip my feet on the Turkey on the left….but heck, he is still cute, right!
Assembly Time! Stack up your 4 Rosettes, aligning them at the bottom. Start with the largest one and Hot Glue the 2nd to the largest one to it. It should stand up almost by itself. Make sure it is centered left to right, but even on the bottom. That is how he stands. Continue on with the next three Rosettes.
![Done3_thumb[1]](https://blogger.googleusercontent.com/img/b/R29vZ2xl/AVvXsEgGvmX7wboCmz2uIcFAsLLlofU0q7ILVwucss-Lu6AL2HubMOkbJILiO6aziSZevUJ0FeeX7rph8TOOfKSo0AurJt3v90N5Eov3ItU-IksNshAeetgFDhJH3Zo77eh3m4zH6ImfPU1TWaY/?imgmax=800 "Done3_thumb[1]")
Now hot glue the back edge of the turkey body to the rosette, Your Turkey will almost stand up on it’s own at this point.
![ConnectTurkey_thumb[1]](https://blogger.googleusercontent.com/img/b/R29vZ2xl/AVvXsEhx0VTFCqTehNweLRO1YoG4NZOB5-Mu_6pbHfKnxVSr_EqkjmBYi-EixvA47MrYNpv3bsTt7KZqDu5NUeCVTVL6R2U-BRRNJNi05Zf3h3mE8TFmJn2i4BbBL4mh4v4m_hvob8HxmlOvVHo/?imgmax=800 "ConnectTurkey_thumb[1]")
Hot Glue the feet to your 6” circle
Hot Glue the bottom of the Rosettes and the bottom edge of the Turkey head to the 6” circle, placing him on his feet.
![Done3_thumb[3]](https://blogger.googleusercontent.com/img/b/R29vZ2xl/AVvXsEiv0LaxnRPgWIvW2UL-OM7Lm3lMTFCXgljlrPw-tKRWhiu6e0RNA_UYSAR3IJra_3YMF1YIelhh5IQwO-eWzyhS-ATFDFqV9hKz2o0sKWymanLLuAIax23AQ5j20G35EYCm1zqoM9tcUWA/?imgmax=800 "Done3_thumb[3]")
Tie a ribbon around his neck, add some Tim Hultz, Tattered Leaves, from Burlap.
THE END
![BackEnd_thumb[1]](https://blogger.googleusercontent.com/img/b/R29vZ2xl/AVvXsEh5c2uKVNRRNFpyuZQSoGxSqK_NX7bT9pIhLJoTf07k-FxNJL4yWAYX1_CZruE5HH6SOx6Dy-DrETkvuzwXhl0xtsVPvXIgSAGX5ybQyzYKbOrxUS6D7hoW44pEA7gAyV_APof0oHGo3aE/?imgmax=800 "BackEnd_thumb[1]")


 Posted with Blogsy

![two turkeys_thumb[1]](https://blogger.googleusercontent.com/img/b/R29vZ2xl/AVvXsEiX6fR1zqsxaV-Djcfxn1OLxx_pyooalfi_9m6uUxHlNnJusiPXyO-IJOcWT7xB-fOqLbWiI3x5ufZw9HcpKeu810VWPzBZJ-I51VfbWNGkhBR6BN94kLCRFU1ER4jlXTAkmu5WMVymRqI/s1600-h/two%252520turkeys_thumb%25255B1%25255D%25255B2%25255D.jpg "two turkeys_thumb[1]")
![4 new sizes 1_thumb[1]](https://blogger.googleusercontent.com/img/b/R29vZ2xl/AVvXsEjPTNONOqf1QaddADODrods62IbdD4K6Jh7LEU7OmV_YOZDVEaaJh41BYInAyK2CM4ogKu5g2W0a3RYKD1DQo3NUJs2psRN2RR4uQrUKW3FCVteWwRpILG8huuB7ClDoxIn0kCQdvKAlQ8/s1600-h/4%252520new%252520sizes%2525201_thumb%25255B1%25255D%25255B2%25255D.jpg "4 new sizes 1_thumb[1]")


![4CircleDone_thumb[1]](https://blogger.googleusercontent.com/img/b/R29vZ2xl/AVvXsEi9RnF1QAzOJz1xKTSmXXKW4k52vEQcm8gvMnKno8bztWCOasmNVAh6qsuaasW2MxUUnPig8NC3bGyjsXoZ7edTJSitX4wdvjTkgRZJUNbb0jwkuOugQht5D36QBp98lkFtnzPiLhDV2tY/s1600-h/4CircleDone_thumb%25255B1%25255D%25255B2%25255D.jpg "4CircleDone_thumb[1]")
![Xyron_thumb[2]](https://blogger.googleusercontent.com/img/b/R29vZ2xl/AVvXsEgrIP-STghIDBDikVicIrkWa30Y-5363L5p36MFh8ML_m67dwrJ_DtLMeHsSbHY08YSFR8xleS-TKQRsojE6_xlDWy8-sypSIF72asNSsspZrwrc2QAK_vElHOPqK3isSi9COoVe_m6t7c/s1600-h/Xyron_thumb%25255B2%25255D%25255B2%25255D.jpg "Xyron_thumb[2]")
![turkey body_thumb[1]](https://blogger.googleusercontent.com/img/b/R29vZ2xl/AVvXsEiA-R70YAsUXYn99q6iPJlX0ltOu_AHR3zLPbI7QZ9Mese5EhL7rVD7aJRpkgjMgSkFA8KTA2xr9oOmk3UJzIsok9e7xecT8YTg2sE7x5-Okss6wjxXfNbctJB1WO5JNWORwuuhYUFH81s/s1600-h/turkey%252520body_thumb%25255B1%25255D%25255B2%25255D.jpg "turkey body_thumb[1]")
![Done3_thumb[1]](https://blogger.googleusercontent.com/img/b/R29vZ2xl/AVvXsEi3QiDrUtLoK69OhF0aNNsALAE76c83EQ3Hh1c7412mdSNhA-BKcQRl9Z4Dhx47YJa4kjZ7qds4fiI0iDkjRGp6je29r5ufo0BZqj0zzNqk-S9wTWtcZYBgnYZVt8pFeibuU9MdJwNXFAU/s1600-h/Done3_thumb%25255B1%25255D%25255B2%25255D.jpg "Done3_thumb[1]")
![ConnectTurkey_thumb[1]](https://blogger.googleusercontent.com/img/b/R29vZ2xl/AVvXsEhPho8CSLb8RQvBISNfUvLnx8a19a-VEJU1Cc_OXcp2oHhXm9vEKdBXExXqtXkyonOLSjpdTEpmwth9aqbIrBAOSqFjvkK1LAQw2tYtNk8D38CAphKeXxfNP5h_cpgPzlK2q7-CFJ8PNAA/s1600-h/ConnectTurkey_thumb%25255B1%25255D%25255B2%25255D.jpg "ConnectTurkey_thumb[1]")
![Done3_thumb[3]](https://blogger.googleusercontent.com/img/b/R29vZ2xl/AVvXsEgOproO3hVZX756_iRq4_14Eltt0LyOWcJYguQ2CNmmxIoakIQa1hx8txD4nt70Sw-VfmvOgqicaFLJaXnzziqmFpAa4EhxetvGzU462uGbcEa_C7922djOKEGnGCcMqteQKWShZx6i55E/s1600-h/Done3_thumb%25255B3%25255D%25255B2%25255D.jpg "Done3_thumb[3]")
![BackEnd_thumb[1]](https://blogger.googleusercontent.com/img/b/R29vZ2xl/AVvXsEgp80tfrlxKLveGsynwIbefZC_3SKmqiD8apeQpTclz75NjBPyoGoeY4TBvXPcHBjUbNIvLqx9aK6EOe8FVqzIW8cOB-u4fJ_dUmo2-ojUud3GLCaYrd71660SduRVecUDJAKOEXye13ko/s1600-h/BackEnd_thumb%25255B1%25255D%25255B2%25255D.jpg "BackEnd_thumb[1]")


