Friday, June 19, 2015

How to make your own clock!

WallClockWaterMark

I always get wonderful comments on my clock!  So I have decided to write directions, so you also can make your own!

You will need:

1 Clock
12 each 5 X 7 X 1 Wood Blocks
Mod Podge Matte
Vinyl Cut (24.143 X 16.342) “TIME Spent with Family Is worth every SECOND”

I purchased my Clock from Steebar.com.  When I priced clocks that size in town, the quotes I was receiving was over $100.

This is what I purchased from Steebar September, 2014 (so the prices might have changed)

Item SKU QTY Price
14” Clock Hands for High Torque Clock Motors HT-8 1 16.75
7/16” High Torque Mini Quartz Clock Movement for Large Hands HT-Mini-A-7 1 14.95
Mini Quartz Clock Motor Wall Mount Cup Wall-Cup 1 5.95

STOP - If you are not crafty, you could always just purchase this Photo Frame Wall Clock, it’s only 40.00 for the whole thing.

If you are Crafty, follow on!

Step One – Order and Mount your Clock

Order your clock.  I am assuming that you are making a clock the same size as I did.  You will need that heavy duty motor, because the hands are 14” long!  Mount your clock on the wall when it comes in.

After I completed the Clock, the overall size is approx. 44” high and 43” wide.

Step Two – Make your Wood Transfers

While you are waiting for the clock to come in, create your wood transfers.  My husband cut 12 each 5 X 7 X 1 pieces of wood and sanded and stained them for me.  I have been told you can go to Lowes and they will cut them for you.  You could also paint them if you don’t want a antique look.

While he was doing that, I found my photos, sized them to 5 X 7.  I choose to print them out in black and white, in Reverse (or Mirrored) on plain ol’ printer paper, from a LASER printer.  If you don’t own a laser printer, you could always take your photo’s to a printer like Kinko’s and have them print them out from a LASER.

You can search wood transfer in you tube and find MANY ways and products to use.  I choose to use Mod Podge, because I had it. 

Here is a great video

Step Three – Hang or Apply your Vinyl Cut

Create your Vinyl Cut or I am happy to cut this for you.  I do offer this in my Etsy Store.

Here are my favorite “How to apply vinyl Videos from YouTube

Easy Way
Larger Decals

I am looking forward to seeing your creations!  Please post your photos back to this blog!

Tuesday, April 28, 2015

How to place Vinyl on a 12 X 12 Tile

Aunt RuthEasel BackEasel Side


Thought I would share, something I learned about these tiles. I had to make 8 of these in the last few days. First of all they take a couple of days to make. Although beautiful, they are a labor of love.

ruin copic

Because most of them are all about marriages, I truly enjoy doing them.  It gives me a opportunity to pray for the couple as I make them.

Step One

I have tried several types of paint and tools to color the edges and have found my Copic to be my favorite method.  I use the brush tip to cover all the edges, flip it over and color approximately a 1/4 to 1/5  frame around the outside of the tile.

Be aware….you WILL loose your beautiful brush tip.  I have one sit aside for just this.  And need to keep a supply of tips on hand, maybe, or maybe not.  I have a refill on order, when it comes in, I might be able to use a brush with the ink, NOT using the marker.  Will let you know.

Step Two

This is my first, that is not a "Family Name" Tile. I have found some easy ways to do this. You know, that ol trial and error thing, we all have to go through.  Hopefully, I will save you some of my frustrations I had to go through.

It will be my example, since I am in the middle of making it.

Well, first of all, I cut the vinyl in 2 passes (Oracal 631).  Next,  I clean the surface with alcohol, being careful to stay away from the edges because my Copic is a alcohol ink.

Weed your vinyl.

Step Three

Then I put the clear transfer tape on top and squeegee it down. Now I have learned to let this sit over-night, IF, I want to make my life easy.  If you take the time to let it sit, you will NOT fight picking up small pieces.

Step Four

Tile with transfer

After you have let the clear transfer tape sit for several hours (my choice is over night), Squeegee it again, and place on your tile.

By doing it this way, I can move the vinyl around the tile before making it permanent.

Now....Let it sit on the tile at least 1/5 hour, taking this step, lets me remove the transfer paper, without disturbing those small details.

As an example, the skinny frame on the outside, if I don’t wait, those will pull up when I remove the transfer tape, HOWEVER....it always goes very very smooth if I take that extra 1/5 hour letting the transfer tape settle on the vinyl and settle on the tile.  Often, I will let this sit over-night.

Step Five

Remove your transfer tape.  Now, if I am in a hurry, of course I can pull this off sooner.  As an example, it’s only been about 1/5 hour and look at what I am dealing with.

tile transfer tape peeling up

I prayed for patience….and let this sit for a couple of hours.  So much easier.  I never have to fight it this way.  I usually let this sit over night.

Love that scraper and those dentist tools!

family and tools

Step Six

Ok, ready to glue on my Easel backs.  I am using a GE Clear Silicone and a doohickey husband grabbed from the garage.  You can get little bottles, but buying them large is a bit of a savings.  I get about 3 tiles out of one bottle of Silicone.

Notice the black “paint” around the back of the tile.  I do this, because I don’t like anything showing between the easel back and the tile.

Notice the black arrow at the top center of the tile?  I do this, to make sure that when I put the easel back on, that I am putting the back on in the right direction.

family tiles glue tool back of tile

I apply the silicone about 1/5 inch from the edge.  don’t get to close, or it will squeeze out onto the sides…and it’s near impossible to get off.    I am just learning how to use that doohickey that the silicone goes into….so make sure, if you use one, you get someone to teach you how to use it.  Hubby is still coming in and guiding me. 

family and glue

Step Seven

Ok, Silicone on and ready for the back.  I match up the black arrow and the top of the easel back.  I get my backs at www.bisoncoatings.com.  Now, You WILL be excited to know how inexpensive these are, but hold that feeling, because it won’t last long when you see the shipping costs.  I think I ordered 20, which adds under 4.00 costs to each tile.  The shipping for these is horrible.  Of course, if you had to ship one to a customer, It would problem be the same price, as the box would have to be at least 14 X 14.

family and easel on

Easel BackEasel Side

Step Eight

Ok, I make sure the edges are are lined up and the top of the back is on the top of the tile.  I place a towel under the tile, because if I scoot the tile (which I don’t want to do) I want to protect the vinyl side of the tile.  Probably don’t need to do…but I just feel better doing this.

family and weight

ok, I have moved my tile to a TV tray in the living room….because this can’t be touched or bumped for 24 hours.  I place a cloth under the vinyl side of the tile, place the tile that is now glued to it’s back and cover that with a towel.  Now I need weight!  I usually place a big heavy cast iron pot I have on top and put a 100 oz container of modge podge in the pot.  But I have all these tiles ready for delivery, and that should be enough weight.

Hope this helps someone!  I know it was a learning process for me.

Aunt Ruth4

321

In 24 hours, my tile will be done, and I will come back and post a photo of it.  Not the best photos in this post, but good enough for you to get an idea how to do!

Hugs!  Robin

Sunday, December 28, 2014

Pazzles–How I am using the Samantha font!

I have NEVER bought a font!  EVER and I use to do desk top publishing years ago.  I fell in love with this font and just had to have it.

I purchased it here (click on the word here) for next to nothing.  Well to my surprise, I could not access the pretty swirls!  Which I knew from reading the site prior to buying.  But, I knew how to use Character Map in Windows….

Well if you ever used Character Map, you will know, its so small, it is just impossible for a old lady like me to design with….

That idea went out the window and now, I had bought the font…..Well, I was going to figure out a way to use this pretty font, come &*(*& or high water.

So, they mentioned using AI (Adobe Illustrator) so off I went to download a trial version that lasted about 15 days or so.

Dear me, did I mention I was older than dirt, and spend a lifetime in IT, retired and swore the only software I was willing to learn was the software for my Pazzles Machine….

It was TO HARD for me and I was unwilling to learn….

So, then I decided to buy the software they mentioned called PopChar by  Ergonis found here.  I use windows so I purchased PopChar Win for 29.99.

It’s been well worth it to me, for the 18 or so dollars for the font and 30 for PopChar to use this beautiful font.

Here are some samples of the the beautiful things you can create with software such as PopChar that allows you to utilize all the extras!

image

image

image

image

Oh and look at these!

image

If you would like to see this font in action, I have made a short video found here.

I wanted you to see how beautiful it is….


Robin

Now that is beautiful, but look at this

image

I did that in about a minute….In the video I will show you how easy this is to access the Glyphs for this beautiful font.  The video can be found here

Pazzles - InVue - How to do a simple Print and Cut

Beginner Level

image

I love my new InVue! One of my favorite features is the Gallery.  This post is written for the Brand New users to the Software InVue.  For those of you who are at the Immediate level or Advanced level, just skim though.   Directions were written for InVue version 2014.1.2.0.610. on a Windows 7 platform.  Directions are written with the assumption you have calibrated your machine.

I created a simple video going over the steps quickly.  It can be found here.  The video is intended to be viewed after the detailed directions here.  If you are comfortable with simple design, than the video is probably all you need.

image

First, Choose the Gallery Icon. Now you can do this a few ways. For you mousy folks out there just click on the Gallery icon.

image

Or just press the g key! (for you Keyboard folks!)

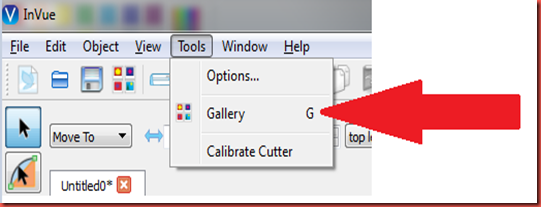
Or Choose Tools | Gallery (Yep, there are Menu folks still around!)
image

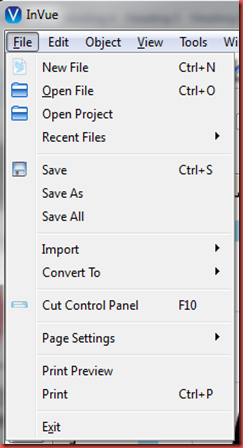
Now, just in case, you wondered how I knew to press the G key…..Notice the little G the red arrow is pointing to?  When you see these in your menu, they are the keyboard shortcuts to the program.  See all the shortcuts under the menu item File?  Not all of us like keyboard short cuts, but for those of you who do….Smile

image

Now, That you have the gallery open

Sign in
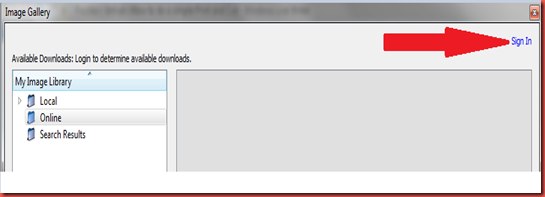
image

Give me a moment to talk to the Pazzles Programmer…Please, don’t make us sign in each and everytime….can’t you remember who we are?  My feelings are hurt!

Ok, back to signing in.

Enter your user name for the pazzles craft room and your associated password.  Then choose submit
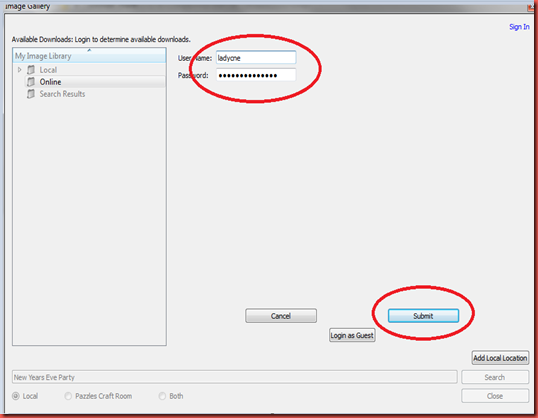
image


In the search field, type in New years eve party.  Choose both and then click Search
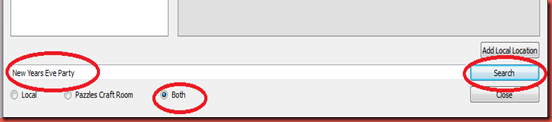
image


Notice the Icons for New Years Clock and New Years Eve Party are different?  The Icon for New Years Clock (The yellow C) means, it’s in the craft room, not on your computer.

Now notice the icon for New Years Eve Party, it’s a blue arrow.  This means, that this image lives on my computer (I have already downloaded it from the pazzles craft room). 
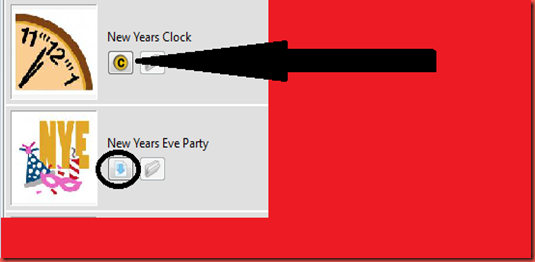
image

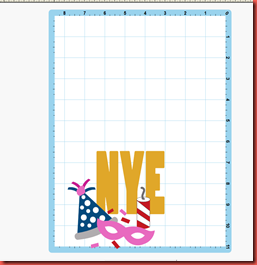
Choose New Years Eve Party and If it shows a C, choose the C.  After you download the image, you will have a blue arrow.  Choosing the blue arrow, will place the image on your mat.  At this time, choose the blue arrow so we can work with this file.

Your mat should look similar to the following image.
image

Now choose the eclipse icon from the left hand side of your screen
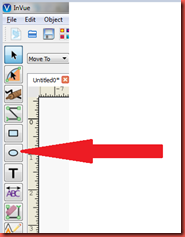
image

After choosing the eclipse icon your menu bar will change on the right hand side.  Notice the Square, Circles Arrows etc?  This is a dynamic tool bar that will change, as you choose things from the menu bar on the left hand side of your screen.

image

Choose the Circle and drag your mouse across the screen.  Let go when you have drawn a circle drawn
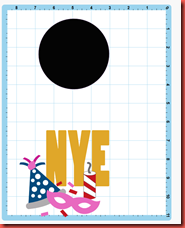
image

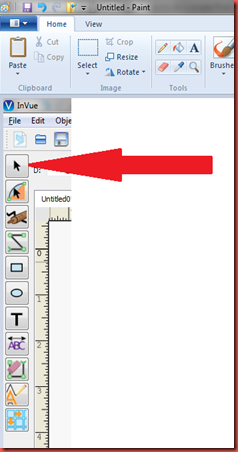
Now, if you click again, you will be drawing circles….over and over and over again Smile.  To stop making circles, choose the select icon from your left menu bar, at the top.  (the select icon is probably the most used)
image

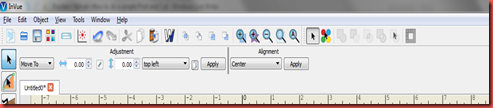
Because you selected a new icon from the left menu….take a moment to notice your new menu items from the top menu bar. I am not going into all these items on this post.  But if you are brand new to the software, this is a wonderful way, to get familiar with all the awesome features that it has and where they are located.
image

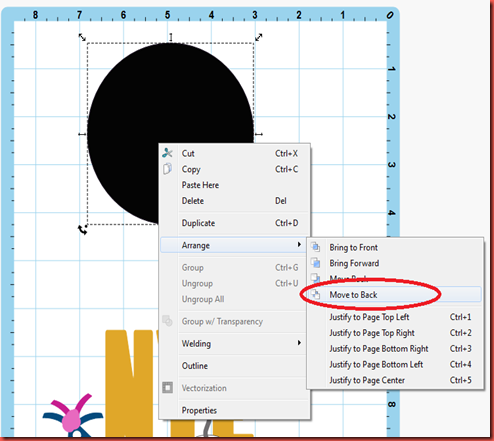
Right click your circle and choose Arrange | Move to Back
image

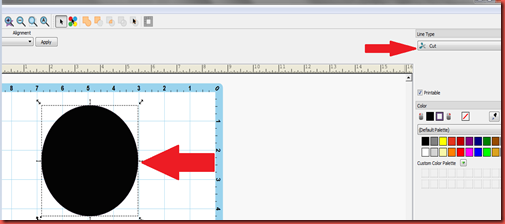
Since we are doing a print and cut, we need to pay attention to the line types.  With the circle selected (notice the selection box around the circle) verify that your line type is set to Cut only.    (on upper right hand side of screen).  Default line type is always Cut.
image

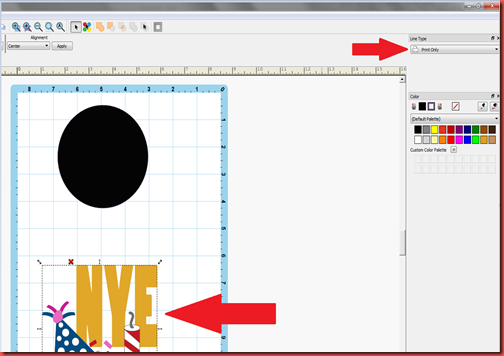
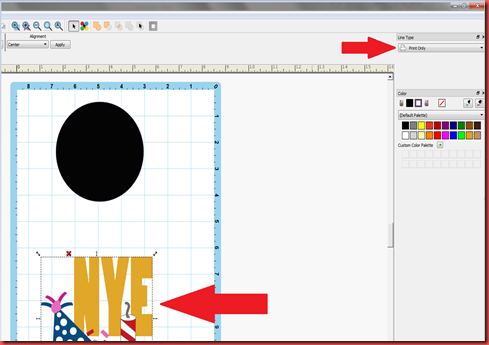
Now select your image.  (Notice the selection box around the New Years Eve Image)  Change your line type to Print Only.  We only want to cut the circle around the image.
image

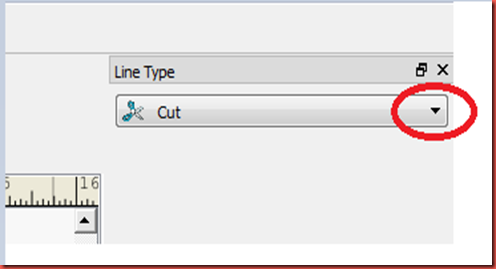
To accomplish changing the line type, choose the drop down arrow on the right hand side of Line Type
image

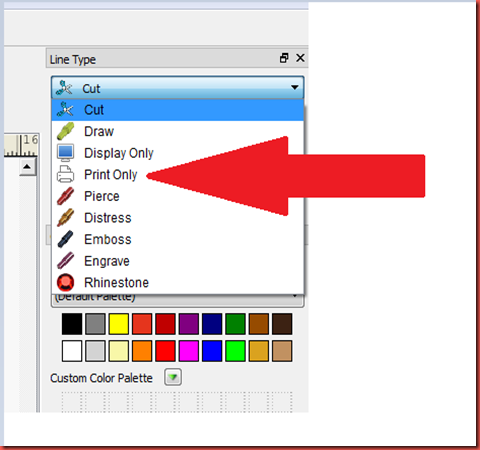
Pretty cool all those options…..We want to only Print this image, so choose print.
image

Now your screen should look like mine.
image

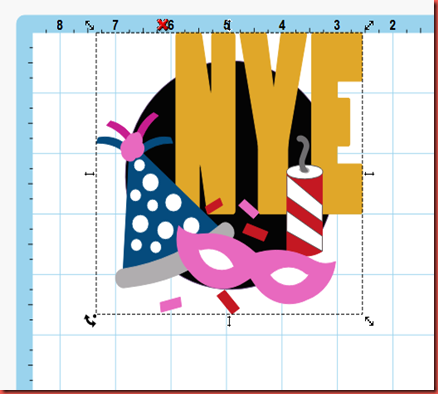
Now drag your image onto the circle.

image

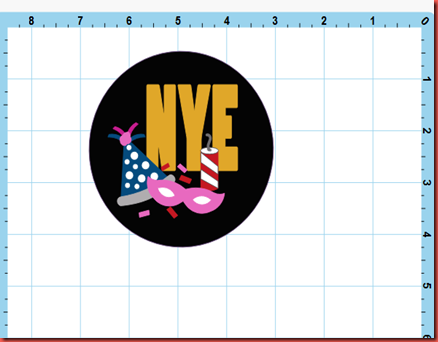
Make your image fit inside the circle
image

Select everything on your page by holding the control key and the A key down.  The control key says Ctrl on it and is usually located on the far left hand side of your keyboard on the left. Za


or select everything by dragging a big square around the circle and the image.  you can start this big old square far away from the image…..it’s easier that way..

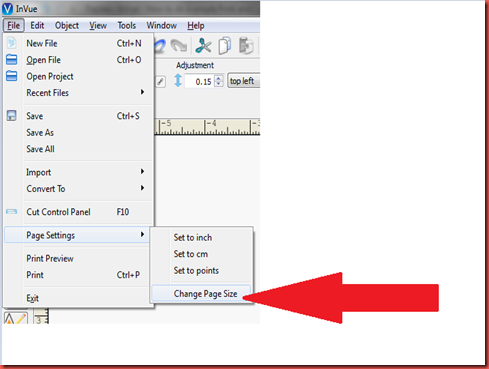
Now let’s verify that your page size is correct.  Choose File | Page Settings | Change Page Size
 

image

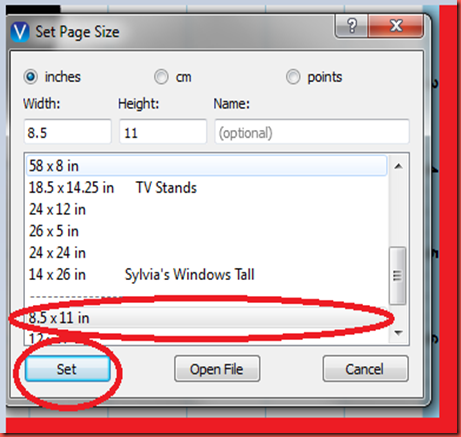
If you need to change your page size, highlight 8.5 X 11 and then choose Set
image

Let’s recap right now.  We found a image, we then put a border around it.  We made the image print only and we made our border cut only….

Let’s verify that.

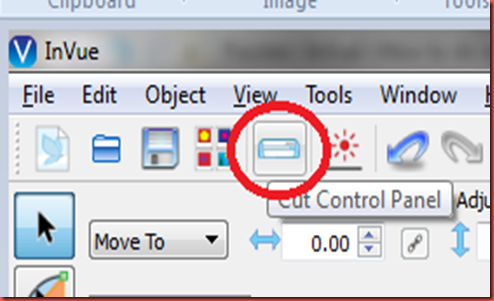
Choose the Cut Control Icon with your mouse
image

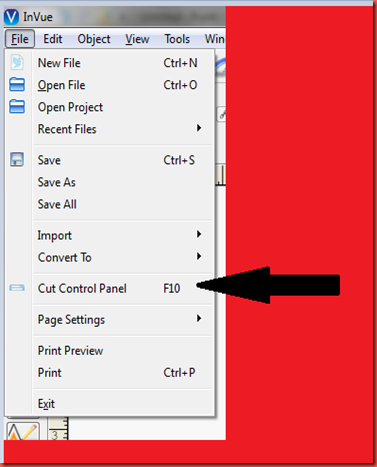
or choose the Cut Control Panel by Pressing)or by choosing from the Menu File|Cut Control

Panel
 

image

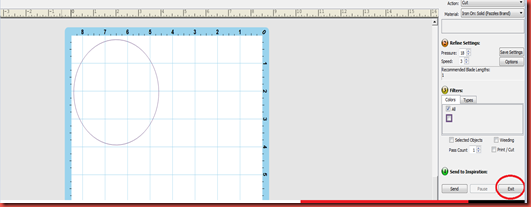
In the cut control panel, you should only see a circle.  If you see the graphic image for New Years Eve Party, you need to go back and change the line style to Print only. before continuing on.  This is how I double check myself to make SURE I have my line styles correct.  Choose Exit from the lower right hand corner of the cut panel
image

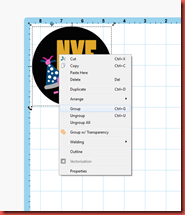
Select your image and group them together. You do this by selecting the circle and the image, then right clicking and choosing group.  From now on, I am only going to give you one set of directions, I think you get the idea about the menu bar, keystrokes etc.
image

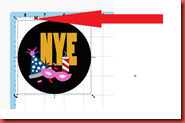
When grouped notice the color of the X changes to red
image

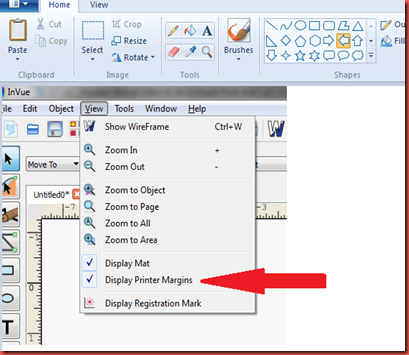
Turn on your printer margins by choosing View | Choose Display Printer Margins (if this feature is turned on, you will have a check mark…if it is turned off, the check mark will disappear).
image

Put your image in the upper left hand corner

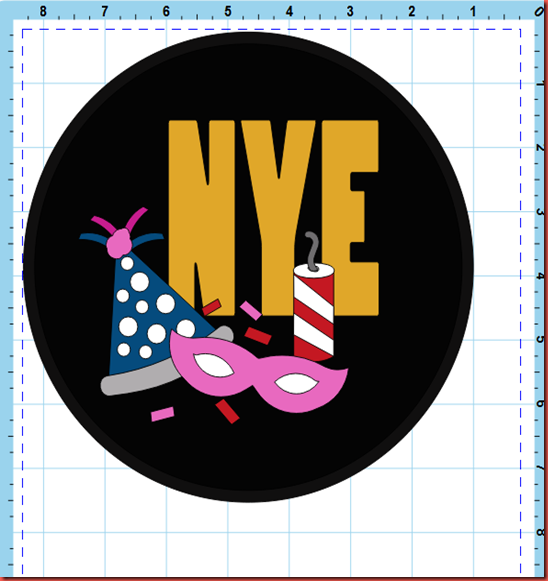
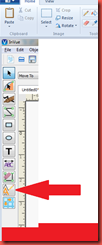
Let’s make a bleed by selecting our grouped image and choosing the outline icon from the left hand menu
image

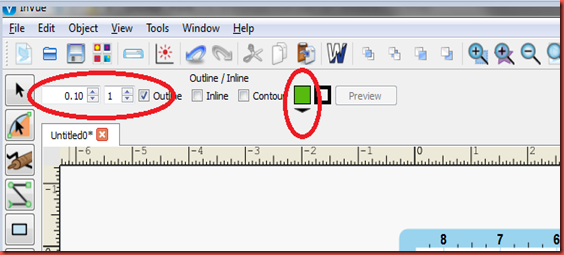
Our top menu, has changed because of this selection.  I have changed:

The width of the outline to 0.10.

Only 1 outline

Outline is checked

But my outline is going to be green Sad smile  Choose the drop down and change to black.
 

image

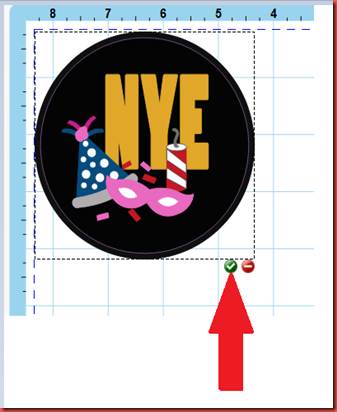
When you see your second circle choose the green arrow.  By choosing the green arrow, you are saying…accept this change to my image…Yeppers, I like that outline.
image

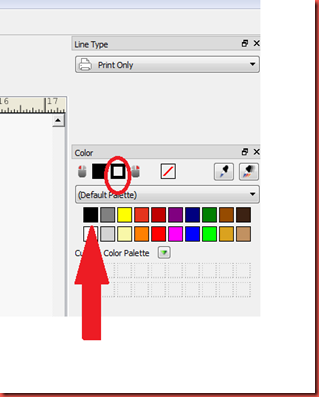
I don’t want to print this grey circle…I want that circle to be black.  Select the grey circle from your image, and change the outline to black.  Now, you do this by RIGHT clicking the square of black in the palette. (where the red arrow below is pointing to).  Then the square box where the red circle below will change to black.
image

Whew….that was a thinker!  Can you tell I had trouble with this?  Ok back to the print and cut.

Now let’s verify our cut line.

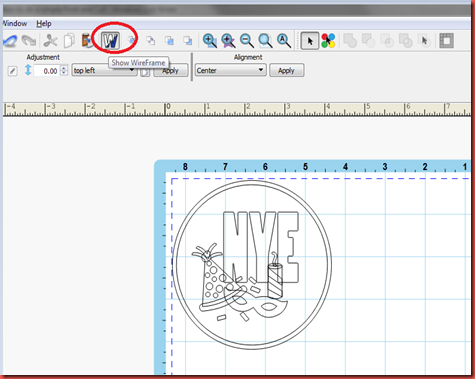
I do this in wireframe.

Choose Wireframe from your top menu
image


ugggg, we have to ungroup our image so select your image, right click it and choose ungroup.

The outside circle should be print only

The inside circle should be cut only

the inside images should be print only.

Notice how my cut line is NOT on the print border….now I am choosing the cut control panel and I know I have the right cut because my circle is NOT on the border!  I’m ready to multiply!
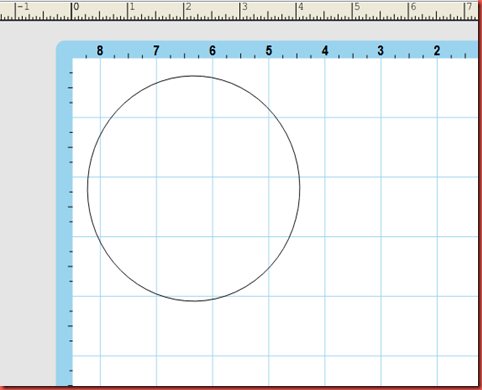
image

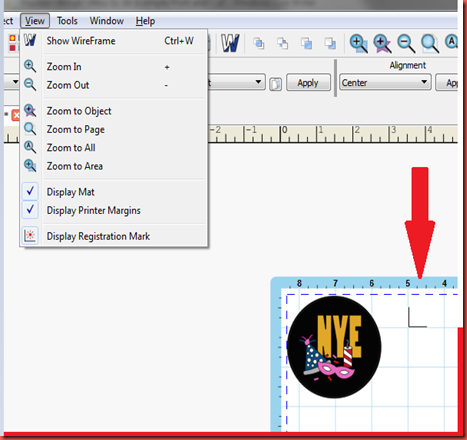
Turn on your Registration Mark by choosing View | Display Registration Mark.  Notice the funky L where the red arrow is pointing to?
image

Now you can print!

Then load that print out onto your InVue Print and Cut Mat (Mat that comes with InVue).

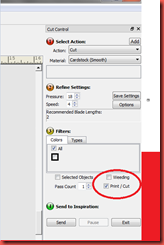
Then choose the Cut Control Panel Check Print/Cut and then Send!
image

Whalla!

Of course, you would probably want to size this, multiply it…etc.

Let’s recap:

  • Get your image
  • Make sure all line styles are set to Print only EXCEPT the outside line, (not counting the bleed line)  which should be set to cut
  • Make a bleed by creating a outline
  • Make sure the outline line style is set to print only.  NOTE to Self:  the second line in from the outside is the only cut line.
  • Verify Paper size is 8.5 X 11
  • Turn on Registration Mark
  • Print
  • Load cutter with print job onto the InVue Mat
  • Choose Cut Control Panel and check off Print/Cut

That’s it!  Of course, you will probably want to size your image…multiply it


For those of you who need to see it, here is a simple video going over the steps.  Click here.