Showing posts with label Pazzles. Show all posts

Sunday, December 28, 2014

Pazzles–How I am using the Samantha font!

I have NEVER bought a font!  EVER and I use to do desk top publishing years ago.  I fell in love with this font and just had to have it.

I purchased it here (click on the word here) for next to nothing.  Well to my surprise, I could not access the pretty swirls!  Which I knew from reading the site prior to buying.  But, I knew how to use Character Map in Windows….

Well if you ever used Character Map, you will know, its so small, it is just impossible for a old lady like me to design with….

That idea went out the window and now, I had bought the font…..Well, I was going to figure out a way to use this pretty font, come &*(*& or high water.

So, they mentioned using AI (Adobe Illustrator) so off I went to download a trial version that lasted about 15 days or so.

Dear me, did I mention I was older than dirt, and spend a lifetime in IT, retired and swore the only software I was willing to learn was the software for my Pazzles Machine….

It was TO HARD for me and I was unwilling to learn….

So, then I decided to buy the software they mentioned called PopChar by  Ergonis found here.  I use windows so I purchased PopChar Win for 29.99.

It’s been well worth it to me, for the 18 or so dollars for the font and 30 for PopChar to use this beautiful font.

Here are some samples of the the beautiful things you can create with software such as PopChar that allows you to utilize all the extras!

image

image

image

image

Oh and look at these!

image

If you would like to see this font in action, I have made a short video found here.

I wanted you to see how beautiful it is….


Robin

Now that is beautiful, but look at this

image

I did that in about a minute….In the video I will show you how easy this is to access the Glyphs for this beautiful font.  The video can be found here

Pazzles - InVue - How to do a simple Print and Cut

Beginner Level

image

I love my new InVue! One of my favorite features is the Gallery.  This post is written for the Brand New users to the Software InVue.  For those of you who are at the Immediate level or Advanced level, just skim though.   Directions were written for InVue version 2014.1.2.0.610. on a Windows 7 platform.  Directions are written with the assumption you have calibrated your machine.

I created a simple video going over the steps quickly.  It can be found here.  The video is intended to be viewed after the detailed directions here.  If you are comfortable with simple design, than the video is probably all you need.

image

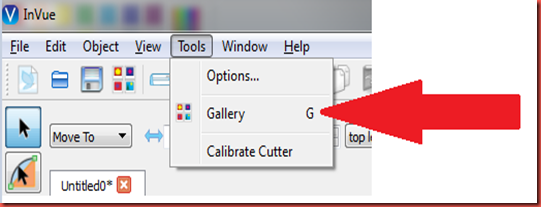
First, Choose the Gallery Icon. Now you can do this a few ways. For you mousy folks out there just click on the Gallery icon.

image

Or just press the g key! (for you Keyboard folks!)

Or Choose Tools | Gallery (Yep, there are Menu folks still around!)
image

Now, just in case, you wondered how I knew to press the G key…..Notice the little G the red arrow is pointing to?  When you see these in your menu, they are the keyboard shortcuts to the program.  See all the shortcuts under the menu item File?  Not all of us like keyboard short cuts, but for those of you who do….Smile

image

Now, That you have the gallery open

Sign in
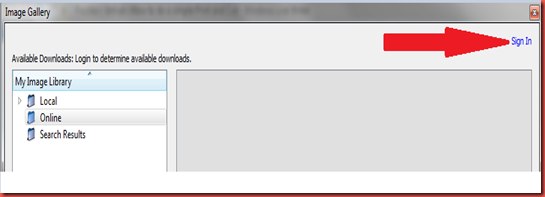
image

Give me a moment to talk to the Pazzles Programmer…Please, don’t make us sign in each and everytime….can’t you remember who we are?  My feelings are hurt!

Ok, back to signing in.

Enter your user name for the pazzles craft room and your associated password.  Then choose submit
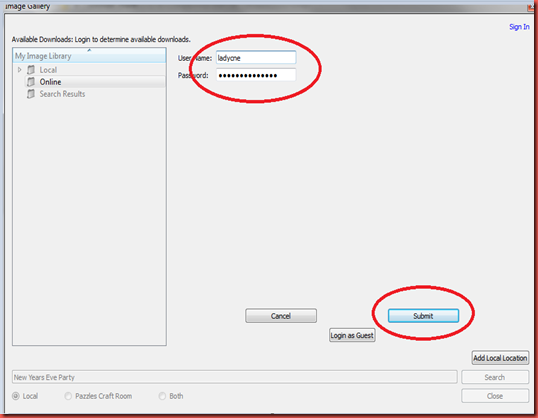
image


In the search field, type in New years eve party.  Choose both and then click Search
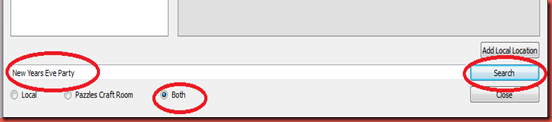
image


Notice the Icons for New Years Clock and New Years Eve Party are different?  The Icon for New Years Clock (The yellow C) means, it’s in the craft room, not on your computer.

Now notice the icon for New Years Eve Party, it’s a blue arrow.  This means, that this image lives on my computer (I have already downloaded it from the pazzles craft room). 
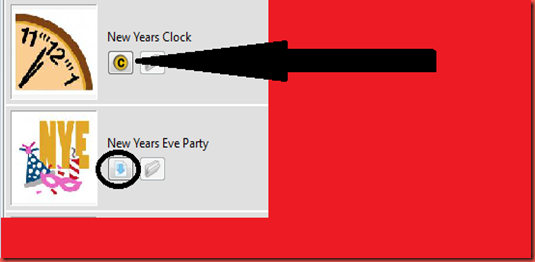
image

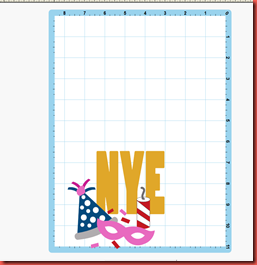
Choose New Years Eve Party and If it shows a C, choose the C.  After you download the image, you will have a blue arrow.  Choosing the blue arrow, will place the image on your mat.  At this time, choose the blue arrow so we can work with this file.

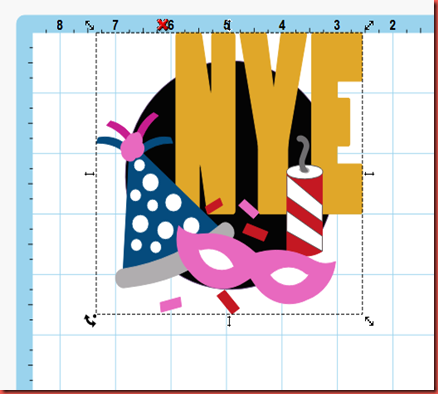
Your mat should look similar to the following image.
image

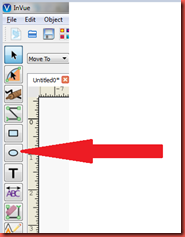
Now choose the eclipse icon from the left hand side of your screen
image

After choosing the eclipse icon your menu bar will change on the right hand side.  Notice the Square, Circles Arrows etc?  This is a dynamic tool bar that will change, as you choose things from the menu bar on the left hand side of your screen.

image

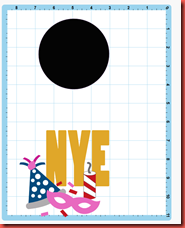
Choose the Circle and drag your mouse across the screen.  Let go when you have drawn a circle drawn
image

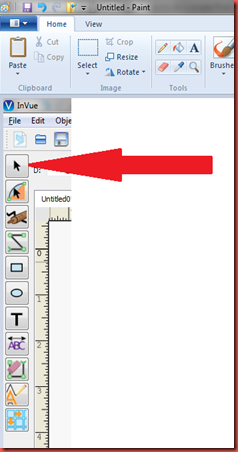
Now, if you click again, you will be drawing circles….over and over and over again Smile.  To stop making circles, choose the select icon from your left menu bar, at the top.  (the select icon is probably the most used)
image

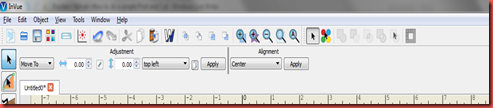
Because you selected a new icon from the left menu….take a moment to notice your new menu items from the top menu bar. I am not going into all these items on this post.  But if you are brand new to the software, this is a wonderful way, to get familiar with all the awesome features that it has and where they are located.
image

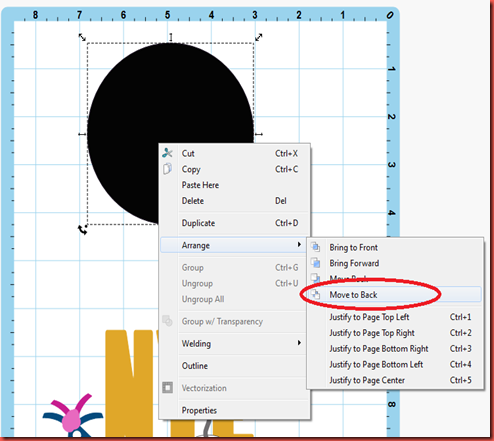
Right click your circle and choose Arrange | Move to Back
image

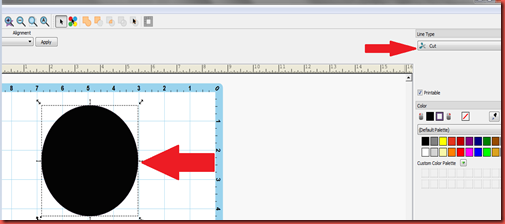
Since we are doing a print and cut, we need to pay attention to the line types.  With the circle selected (notice the selection box around the circle) verify that your line type is set to Cut only.    (on upper right hand side of screen).  Default line type is always Cut.
image

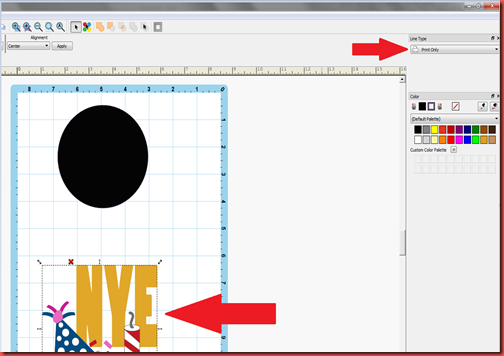
Now select your image.  (Notice the selection box around the New Years Eve Image)  Change your line type to Print Only.  We only want to cut the circle around the image.
image

To accomplish changing the line type, choose the drop down arrow on the right hand side of Line Type
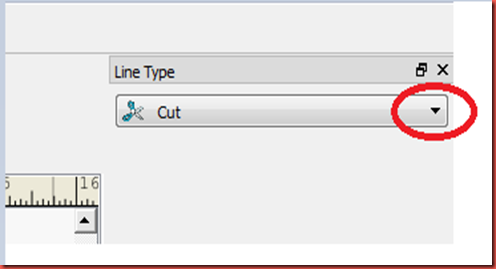
image

Pretty cool all those options…..We want to only Print this image, so choose print.
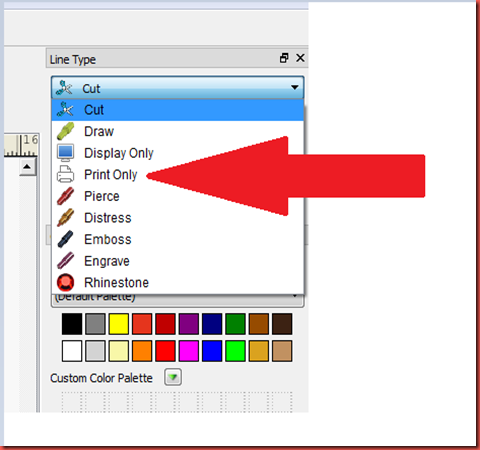
image

Now your screen should look like mine.
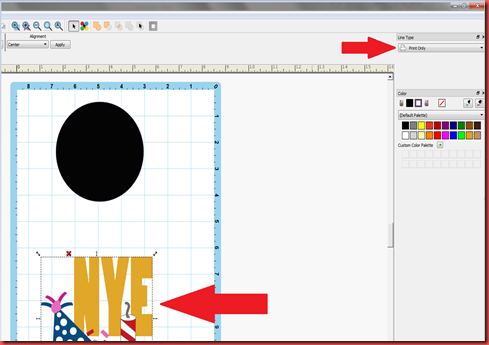
image

Now drag your image onto the circle.

image

Make your image fit inside the circle
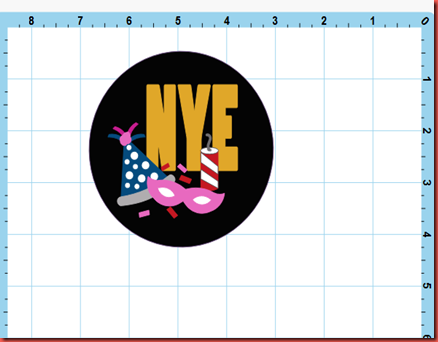
image

Select everything on your page by holding the control key and the A key down.  The control key says Ctrl on it and is usually located on the far left hand side of your keyboard on the left. Za


or select everything by dragging a big square around the circle and the image.  you can start this big old square far away from the image…..it’s easier that way..

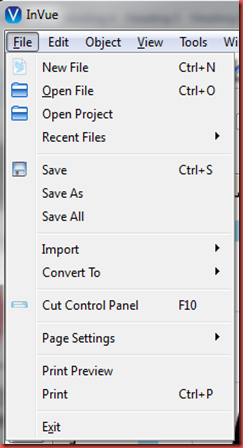
Now let’s verify that your page size is correct.  Choose File | Page Settings | Change Page Size
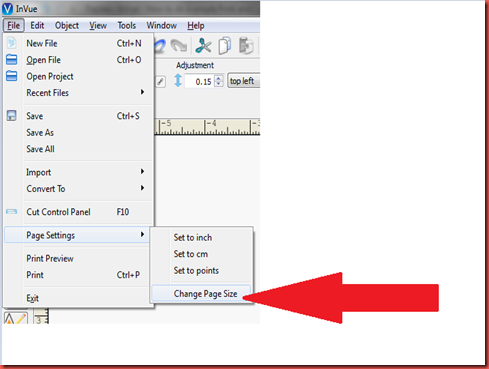
 

image

If you need to change your page size, highlight 8.5 X 11 and then choose Set
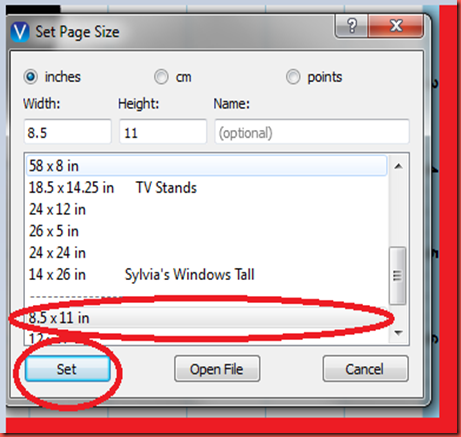
image

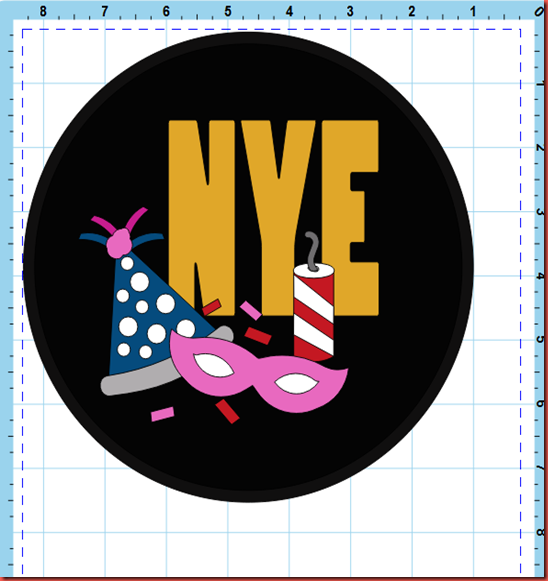
Let’s recap right now.  We found a image, we then put a border around it.  We made the image print only and we made our border cut only….

Let’s verify that.

Choose the Cut Control Icon with your mouse
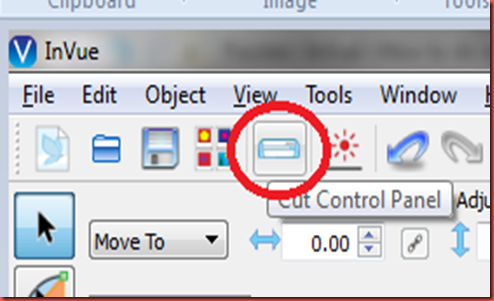
image

or choose the Cut Control Panel by Pressing)or by choosing from the Menu File|Cut Control

Panel
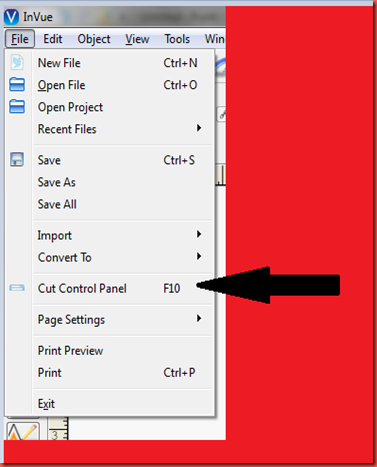
 

image

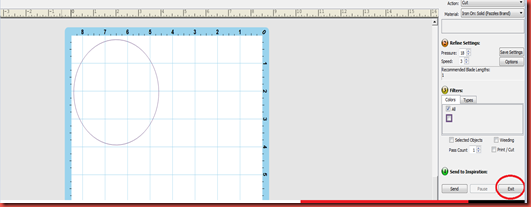
In the cut control panel, you should only see a circle.  If you see the graphic image for New Years Eve Party, you need to go back and change the line style to Print only. before continuing on.  This is how I double check myself to make SURE I have my line styles correct.  Choose Exit from the lower right hand corner of the cut panel
image

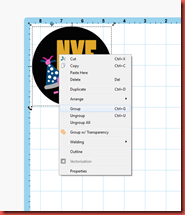
Select your image and group them together. You do this by selecting the circle and the image, then right clicking and choosing group.  From now on, I am only going to give you one set of directions, I think you get the idea about the menu bar, keystrokes etc.
image

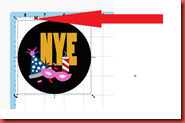
When grouped notice the color of the X changes to red
image

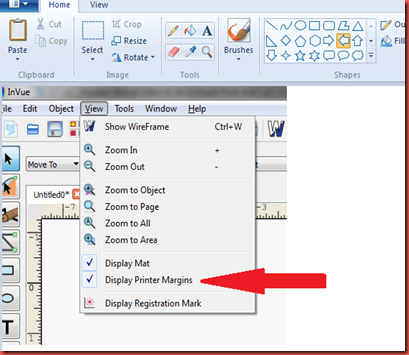
Turn on your printer margins by choosing View | Choose Display Printer Margins (if this feature is turned on, you will have a check mark…if it is turned off, the check mark will disappear).
image

Put your image in the upper left hand corner

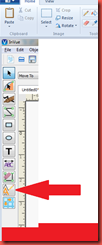
Let’s make a bleed by selecting our grouped image and choosing the outline icon from the left hand menu
image

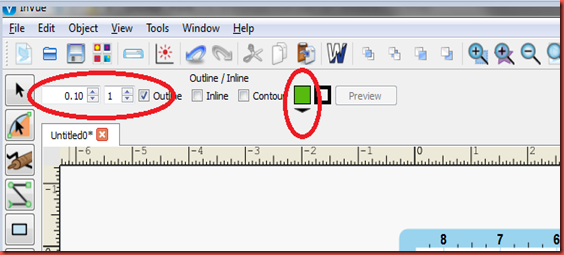
Our top menu, has changed because of this selection.  I have changed:

The width of the outline to 0.10.

Only 1 outline

Outline is checked

But my outline is going to be green Sad smile  Choose the drop down and change to black.
 

image

When you see your second circle choose the green arrow.  By choosing the green arrow, you are saying…accept this change to my image…Yeppers, I like that outline.
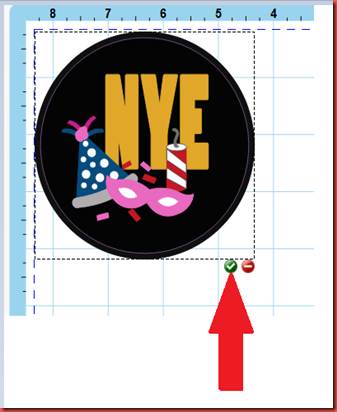
image

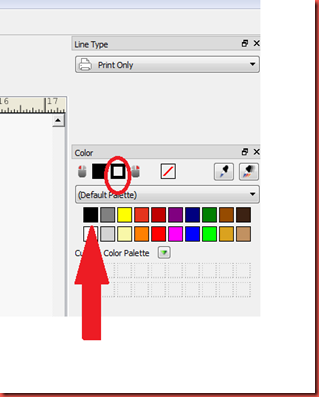
I don’t want to print this grey circle…I want that circle to be black.  Select the grey circle from your image, and change the outline to black.  Now, you do this by RIGHT clicking the square of black in the palette. (where the red arrow below is pointing to).  Then the square box where the red circle below will change to black.
image

Whew….that was a thinker!  Can you tell I had trouble with this?  Ok back to the print and cut.

Now let’s verify our cut line.

I do this in wireframe.

Choose Wireframe from your top menu
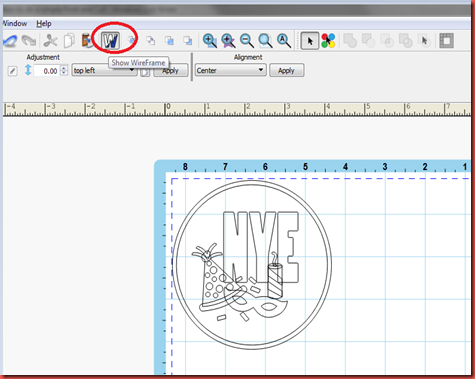
image


ugggg, we have to ungroup our image so select your image, right click it and choose ungroup.

The outside circle should be print only

The inside circle should be cut only

the inside images should be print only.

Notice how my cut line is NOT on the print border….now I am choosing the cut control panel and I know I have the right cut because my circle is NOT on the border!  I’m ready to multiply!
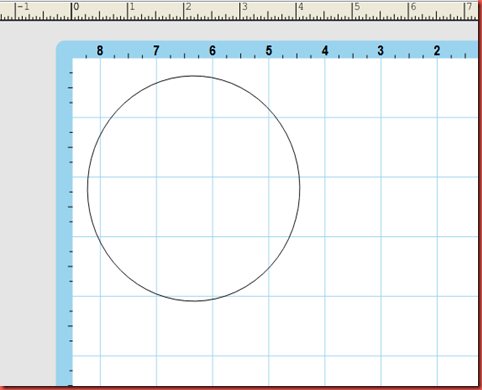
image

Turn on your Registration Mark by choosing View | Display Registration Mark.  Notice the funky L where the red arrow is pointing to?
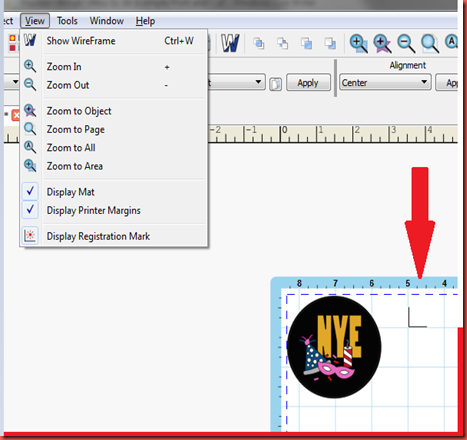
image

Now you can print!

Then load that print out onto your InVue Print and Cut Mat (Mat that comes with InVue).

Then choose the Cut Control Panel Check Print/Cut and then Send!
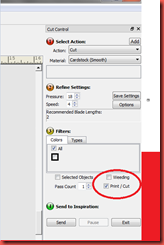
image

Whalla!

Of course, you would probably want to size this, multiply it…etc.

Let’s recap:

  • Get your image
  • Make sure all line styles are set to Print only EXCEPT the outside line, (not counting the bleed line)  which should be set to cut
  • Make a bleed by creating a outline
  • Make sure the outline line style is set to print only.  NOTE to Self:  the second line in from the outside is the only cut line.
  • Verify Paper size is 8.5 X 11
  • Turn on Registration Mark
  • Print
  • Load cutter with print job onto the InVue Mat
  • Choose Cut Control Panel and check off Print/Cut

That’s it!  Of course, you will probably want to size your image…multiply it


For those of you who need to see it, here is a simple video going over the steps.  Click here.

Sunday, November 9, 2014

Vinyl–It cuts like butter!-Once you get the hang of it!

How to weed and apply transfer tape
Part two.  How to clean up a font

You must have 6 things…which I will explain in detail below.

1 - Machine

2 – Blade

3 - Mat

4 – Vinyl

5 – Tools

6 – Transfer Tape


1 - Machine

Those of you, who know me, know I have had an electronic die cutter since the Circuit Expressions came out.  It was limiting…..I sold it for a Pazzles Inspiration.  Best tool I have ever bought, since 2003!  Now that’s a mouthful.

I will say it again, best tool I have ever bought, since 2003!

Reason…It cut’s more material than the others in it’s price range.  Including pastry (yea I said that even cookies)  The Training in the Craft Room is invaluable.  What good is a machine, if you can’t use it?  Well, the support and training is superior.  For that reason along, I would recommend this machine….and I don’t get any money for saying that…I have no connection with the company to say that, other than being a satisfied customer for years, and I am on my second machine.  Sold the first one, nothing was wrong with it, the company just came out with a new model and I HAD to HAVE it.  It’s called the Vue.

2 – Blade

Just the same blade that comes with your machine….BUT….a new one.  or one that has NEVER cut paper.  Then ONLY use this blade with Vinyl.

3 – Mat

Your mat is important.  Get one mat and ONLY use it for Vinyl.  Be very careful with it.  If it is a new mat….you really have to condition it so that when you pull up your vinyl, it does not stretch it.  How to condition your mat, instructions can be found here.  The key is….You have to do this maybe 3 times….Vinyl is more sensitive than paper  If you have a paper mat, that is working well and is very very clean with no cuts in the mat, I would suggest using that one.  It takes a long time to get a new mat conditioned.

When you put your vinyl on the mat, make sure nothing is on the mat.  Practice taking the protector off and hanging it on the wall…it’s very important that your mat is clean.  I had my hubby hang a hook by my machine…

After I inspect my mat I put my vinyl down on it.

Then I squeegee it down, to ensure my vinyl will not slip.  If my mat is getting old…I use painter’s tape around the edges…but that rarely is needed.


4 – Vinyl

Ok ALL Vinyl is not EQUAL.  Trust me on this!  I bet a good year went by before I ever cut vinyl the 2nd time!  I hated it!  Then I tried again, and hated it again.  Let’s just say, the vinyl I owned came off ebay…Goodness knows what brand it was……….let’s just say, it was the vinyl from hell.

With that said, and after the experience I had, I will only cut vinyl I purchase from http://www.expressionsvinyl.com/   

Maybe when I get braver, I will try buying it from somewhere else.  My vinyl from there costs me about 1.99 per 12X24 sheet.  I buy it in the rolls. 

See this “bump”

15726089506_d203fe21ff_m

Look what it was…


15129844734_ebc8a70425_m

Grass and a hair…..I simply lifted up my vinyl to that point, and removed it, then laid my vinyl back down.

See those bubbles?

15564980000_af87ea2b1c_m

When you squeegee your vinyl down, start in the middle and push out to all edges.  If you see a bubble then start in the middle and squeegee towards the edge

15564639937_6207b251fb_m

As long as the vinyl does not wrinkle you are good to go

This is a bad cut.  Two things here I want to point out, that I have found true for me.  This cut was made in Pro 2014.  Pro 2014 recommends the blade length to be 1.5.  I don’t cut as well in Pro 2014, so I did the second cut in InVue with a blade length of 1.0.  Just my preference.  Pro probably would have made the same cut changing the blade length….

15564575398_a775b29410_m

Here is what the back of the sheet looks like….Do not Cut through to the paper like this.  It’s very hard to weed, and very hard to hang.  Not impossible, but if vinyl is done right, it’s a dream to weed and hang.

15564851527_75eb90a345_m

You probably can’t see this, but both cuts are side by side  The good cut is on top…no tearing of the vinyl, or of the backing paper

15565209460_52d1be7af3_m

Remember to hang up your mat.  My protective sheet is behind my mat.  On the protective sheet I took a Permanent Marker and wrote “Vinyl Only – This side Up”  That tells me which side to put down on my mat, when I am finished working on it.

15130628933_c26f1f04c0_m

5 – Tools

Now for weeding!  I love this part!  Ok tool on the left, is a bondo scrapper.  Pretty cheap, just go to Lowe’s.  I paid 3X’s as much for the scrapper on the left.  I use this to squeegee my vinyl down and to squeegee down my transfer tape and to apply my vinyl on my wall or other surface.

….  Next tool is a craft knife.  I use this to cut around my letters when weeding, or to cut off a good piece of vinyl to save that would otherwise be thrown away.  Great when I have lots of lines that are close to each other.  Those are hard to weed and sometimes hard to separate with scissor, so I use a craft knife and cut only through the vinyl…not the backing paper.

The next 6 and the blue tool next to the scrapper….are tools I bought on line.  Just search for Craft Dental Picks or tools.  These are soooooooooo wonderful.  they help with all kinds of weeding tasks.  The green one is a cricuit tool  I use it to lift up the vinyl…very rarely, but I do have it.  The far right one I believe I bought from Pazzles, I use that one rarely.

Scrapper…I clean my mat with this….when I have lots of junk left over on it.

15131244213_0178b23b22_m

I forgot to say Scissors!  I love these scissors…..no other one do I ever want to pick up.  I need about 3 more of these!  Tim Holtz is the brand.

Ok, back to business.  The first thing I do, is separate my images.  See the two pieces on the left?  One is the bad cut and the bottom is the good cut.

The square on the right is a pieces with nothing on it.  I save these pieces for other projects…they work perfectly on cups!  You could use the craft knife to do this with or the scissors.

15131247183_f1c1940e9a_m

I usually start in the corner and hold my finger down on the Vinyl piece I want to keep and kinda “pop” up the piece I am weeding away.  Hope this makes since.  Most the time, I can just wiggle the vinyl left and right and I am all done weeding.  All the vinyl that will be tossed just comes right up.  This piece, has VERY delicate cuts…So I have to be a bit more patient and carful. 

15565481357_814fbc8cdf_m

;When it’s a delicate cut I take one of the dental tools and run it around the outside cuts.  Hope you can tell that from the photo.  See how its now separated?  It’s rather hard to take photos while I’m doing this…so I pray, this is making since.  Oh my goodness!  I forgot to tell you about my light!  If I did not have this light, I would not be able to see to weed….gosh, I’m getting old!

15726940196_bcf7c6166b_m

Can you see the line around the top of the image?  That is what I was trying to show you in the photo above.  It has already been separated.  I use the dental tool to “pick up” the inside pieces like I am doing below

15565484477_1e1e79f468_m

This is the best thing I learned when I first started weeding.  To cut away what you don’t need ASAP.  You know, if you don’t do this…by the time you get to the end of the piece its sticking back to the vinyl you do need!  DUH  I bet I am the only one who did this…until it dawned on me to cut it off, so I am lifting and cutting constantly, IF the vinyl doesn’t wiggle off right away…which would mean, no need to do this…remember, this is a delicate cut…most cuts are not this hard.

15565833210_c0d6987431_m

See, I weeded a little and cut it off.  Of course I have a hand problem…this technique just works for me.  Less to hold and I can see better where I am at.

15750653195_75ec7a3769_m

All done!  Vinyl makes my life GRAND!  LOL!

15565490397_22456e8ab7_m

6 – Transfer Tape

I prefer the Clear Transfer Tape, which I purchase from Expressions.  I bought the 12 X 100 Yard… I like the clear because you can see through it to place it on the vinyl and you can see through it when you go to put it on your project. 

Ok, for my cut, I need a piece that is 2.5 X 17.  My roll is 12 across.  So, I cut off a piece that is about a inch bigger than 17.  Thank you Hubbie for letting me take this photo.  The ruler sticks to the transfer paper and that allows me to cut it pretty straight.

15752664622_8ee639555a_m

I then “bow” the transfer tape over the top of the cut.  Since I can see through it, it’s pretty easy to place.  I always put down the transfer tape in the middle first and just let the ends “fall”  You want to get it pretty much right the first time, then squeegee it out.

15751162065_276be81ec7_m

For this one I placed it way at the bottom.  (I have to make 10 of these cuts, so I will use the left over transfer tape on the others.  Until then, I just stick the “left over” tape back on the roll.

15131210104_25589ceb4f_m

All done!  9 more to go!

15727458916_1b262df941_m

I need 10 of these cuts, so I only cut one, to see how it cut.  It works but was a bit to much work, I will create another blog, showing you what I do in the software to “clean” it up, so that weeding is much easier.  It took me about 3 minutes to weed, which is to much work, if I can clean it up. 

It makes it worth it to me, taking the time to take the photos and put this together, if you comment!  I love your comments!  If you take the time to read this, please leave a comment!