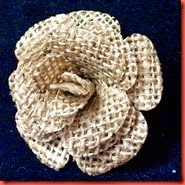
Tuesday, September 9, 2014

My Husband and Father-In-Law Fired Me!


I really have to laugh at that title.  Have you ever tried something new to you, that you had never ever tried before and was tickled pink with your results?

These shutters put in time….on the front of my house for 42 years.  I did not have the heart to throw them away.

0172a3debec12d59d35ec4851bdd933bc100e3c8ce

I needed a headboard for a new bed we just purchased…..

IMG_1305

This was my first time using Annie Sloan Paint & Wax.  Now, you have to know, I have been married for 36 years.  My dear sweet father-in-law, Joe AND my husband would fire me every time I picked up a paint brush.  We had several rentals for ever and was always having to paint…after a while, I just quite trying and was satisfied to be a gofer. 

So………….You CAN teach an Old Dog new Tricks! 

My second project was a wall clock.  I had tried several different photo transfer techniques I found on you-tube using Mod podge or acrylic gel as a top coat…but holey smoley, when I tried Annie Sloan Clear Wax and Dark Wax, the result was simply beautiful!.  Here is the wall clock.  My order for the clock has not arrived yet, so…yep, I cut some vinyl hands.  Have I mentioned I love my Pazzles Machine?

01a875ead29d29442f07f6edfacdbaf3ab045a0bb5

This is my next project.  Larry is putting a drop cloth in the living room as we speak (wait is that term appropriate here?  HA  Well, I think, I am talking to you…so, I am going to leave it in.

Pretty rough wouldn’t you say?  I am so excited about this piece, for one, I purchased it from a beautiful young lady, that I met when she was 4 years old.  So, this piece will be special to me, because it came from Sky!  It will always remind me of Pismo Beach..Camping, Smores around the campfire and playing cards with the cutest little girl, who has grown up to be a beautiful woman!

SkyDresserSkyDresser2SkyDresser3SkyDresser4

Wednesday, August 27, 2014

WOYWW - 273

IMG_2492

Well, it’s almost 5:00 PM on a Wednesday….and I remembered all you crafty folks from around the world!  It’s What's On Your Work Desk Wednesday!  Crafty folks from around the world share just what their work desk looks like on Wednesday…No cleaning up first!  Stop over at Julia’s to take a visual trip around the world of others, just like you!  This is the 273rd week that Julia has hosted with wonderful event.

I have been working on a photo clock….the placement of the “frames” is haunting me…You can see above I just coated my first wood transfer Gel, it’s still wet.

Getting the “round” look to a clock is just haunting me…

This was my first attempt….tacking 5 X 7 pieces of black typing paper on the wall…clock step 1

After looking at it for a day…decided it was to large..  I like this size better.  Tomorrow, Hubby is going to help me level it out.

IMG_2493


Then I can cut my vinyl and place “Time Spent with family Is worth every second” in the center.

clock step 0

Hope to finish that tomorrow.

Picking out 12 family photos and transferring them to wood and distressing them, now that’s going to be a challenge…but I love getting my fingers in ink so that’s the fun part.

Today, I made some blackberry and cherry pies in little mason jars….thought I would share with you.  They are in the oven now and they smell yummy!

IMG_1292

Have a wonderful week!

Thursday, August 7, 2014

What’s On Your Workdesk? Wednesday 270

IMG_2377

I have been working on organizing my scraps AGAIN!  I think this might be a winner for me.  I have collected scraps for 11 years and they are WAY out of control.  Notice I said THEY are out of control, NOT ME. 

In the box to the left are my solid color scraps I have cut up into sizes.  This includes my card bases.  The patterned paper will basically be cut into card base size.  So, this should make my life easier, I am thinking…If the solid paper is not 3 inches….I will be tossing it…and if the patterned paper is not  4 1/4 X 5…not so sure I will be tossing that yet.

As I use this system, I will let you know if it works for me or not…

Now for some fun.  I am writing this on Thursday, because….I had preordered a new Pazzles Vue and it arrived!  Yippie Skippy!  It’s actually Thursday, because I stayed up late going through my book and trying to import a digi for the Cut and Print feature. 

IMG_2378

Now trying to find a simple digi to work with . . . Cute Cow!

IMG_2369

It was late…I missed some of his foot, poor Daisy the cow.  Ok, now to quickly color Miss Daisy after midnight…

IMG_2371

lNo fussy cutting.  This was my first attempt, and I had moved my outline prior to cutting.  Had it not been so late, I would have fixed it.  Tasks for today:

Making the “white” not show up by doing an inline cut.

IMG_2376

I am really impressed with the cut and print feature, after doing this quickie.

Have a wonderful week my friends!  If you are wondering what WOYWW is, hop on over to the Stamping Ground to peek at craft desks all over the world.

Wednesday, July 30, 2014

What's On Your Workdesk? Wednesday 269

IMG_2349

WOW, I have not done a post for WOYWW since November 24, 2013.  Time sure goes by fast!

I have missed this group!  Guess what!  I finally retired!  I have been so busy working on my house that I have done very little card making.  I have however been busy making vinyl wall hangings for my home, sewing pillows for my patio set, making burlap roses….mason jar soap dispensers, homemade laundry soap, canning stuff from the garden (I think most are are blogged) but….no cards!

What is up with that!

I ordered a cute little Halloween stamp, and this morning it looked so ignored on my VERY MESSY Desk…while working on it, I remembered WOYWW and decided to pop in and say “Hi” and see if I could find Julia’s purple glasses.  If you don’t know what WOYWW is….Pop over to Julia’s Stamping Ground and check it out…

IMG_2352

Now, what is on that desk…goal for today, clean craft room….I hate it when my desk is a mess…really and truly…The flowers just above the Halloween card are fabric…you can see my burlap flower project. This project started off, because I wanted one of those cute Mason Jar Soap Dispensers in each bathroom.  Well that was easy enough.  Even made my own soap to go in them (1 C shredded soap (I used old hotel soap I hoarded and 1 C water, boil till dissolved).  Of course I needed to decorate the jar, which lead to decorating the old Dixie cup holder you see and my towel basket.

Do you see that little pin cushion, just above the card….so simple………..yeah right, for everyone but me…a girlfriend was over, and for the life of us, after we stuffed the lid we could not screw it back on the mason jar….finally found another tutorial that made since to me and it worked.  Thank goodness for YouTube.  Simple project………………..took 1/5 day to figure out….must be my age…

Well that’s all for today…praying I don’t wait another 8 months to visit!

Monday, July 21, 2014

How to Make a Burlap Rose–Part 3

My Journey of trying to cut Burlap with a Pazzles Inspiration Electronic Die Cut Machine – PART 3

IMG_2285.jpg-2_thumb1

Part 1 - How to prepare your Burlap
Part 2 – How to Assemble the Rose.

IMG_2339

Well, mud on my face, I was unsuccessful!  I was just told that sometimes a steel die just works….and I truly could have made 100 Roses by now, by not fiddling with this.

But just incase you want to give this a go, I will tell you what I did, and if you figure this out, please let me know!

IMG_2328

I took prepared burlap (prepared burlap from now on will mean, I have dipped it in the 50% mod podge and water to stiffen it) and used painter’s tape to tape down to my mat.  I used the balsa wood setting with the blade at 6.  The burlap moved, Had to stop my machine.

I put the raw burlap on my mat and covered it with clear contact paper.  This cuts but you really can’t see the shape well. 

IMG_2329

I put the prepared burlap on my mat and covered it with clear contact paper. This cut’s but slips

I tried it again, but sandwiched the prepared burlap between the contact paper. 

IMG_2330

I sandwiched the prepared burlap between two sheets of freezer paper and fused it by ironing it.  This performs like the contact paper, except the paper get’s cut perfectly, so when you do a second pass it lifts up.  Contact paper is better.

IMG_2331

Oh dear God, where was my mind?  I sandwiched the burlap between two sheets of red tape.  Worked!  but…..OF COURSE it leaves the burlap sticky on both sides….another No-GO and this brainy idea of mine, could have been a blooper!

It just dawned on me, while typing this, to fuse the freezer paper to the burlap and cover it with the red tape…Just measured the thickness it’s 1.69MM which is under the 2.0MM limit of the machine.

I am going to post this, as I need to have a rest from this project.  Have you ever worked on a problem so long that you just don’t want to do it any more?

Sorry folks….at this time, I would highly recommend using the BIGZ die.


01eca9ba8eeb78d23f95546d650de9a0799201fdfa23579721977569998b63048a66de97[2]0187462269055cda4e7d9966c7e4131685cd[1]

Sunday, July 20, 2014

How to make a Burlap Rose–Part 2

How to prepare burlap for die cutting – Part 1
My journey trying to cut burlap on my Pazzles - Part 3 

IMG_2285

Please refer to Part 1, How to prepare your Burlap for Mechanical Die Cutting or Electronic Die Cutting.

IMG_2232

Now that you have your burlap dipped in glue, dried and trimmed up, you are ready to cut!

What you will need:

IMG_2292

Notice I have laid my burlap covering the big flower.  I of course covered with another clear plate and ran this through.

IMG_2293

Easy Peasy!

IMG_2294

I slid the burlap over and cut the second one.  Of course if you want the little flower you could just cover your die and cut normally.  To make a Rose, you will need three each of this large flower.

IMG_2295

I was not happy about all the burlap stuck on my new die!  I found that these lent free towels do a wonderful job of cleaning them up.

IMG_2296

Hum…had to go make breakfast, took a shot of this…I think it should say Grease a Marie Callender’s Pie Tin, not a round cake pan…I’m Just Sayen…

The best way to learn how to do a rose is to watch Lorinda's Video.

I’m just going to give you photo’s so that if you are like me, you want to print it out and follow along…

WPC File Of Sizzix Die
Cut up WPC File
InVue PGV File
SVG File
JPG File

IMG_2298

This should make since, after you watched Lorinda’s Video.  Should I say, I pray it makes since!

All the black lines are cut lines

  • Flower #1
    • Cut between the petals, one time to the center.
    • Cut between the petals approximately 1/4 inch.
    • Cut the top of the petal off just to the right of your cut to the center of the flower and throw away.
  • Flower #2 and saved piece.
    • Cut between the petals, one time to the center.
    • Cut one entire petal off and Save it.
    • Cut the top of the petal off, just to the right of your “V Cut” or maybe better said, just to the right of your center cuts, and throw away.
    • Cut between the petals approximately 1/4 inch.
    • From your saved petal, cut two petals, it will resemble a heart when done.
  • Flower #3
    • Cut between the petals, one time to the center.
    • Cut two petals off. and Save it.
    • Cut the top of the petal off, just to the right of the above cut out and throw away.
    • Cut between the petals approximately 1/4 inch.
    • From your saved petal, cut 4 petals, it will look like two joined hearts

IMG_2299

Flower # 1

Here is where the video is much better than the photos to learn.

Just notice this layer has 5 petals after you have hot glued it.

I took a skewer and rolled each petal under

Then place it on the table and slightly pushed the flower down in the middle to slightly shape it.

IMG_2304

Flower #2

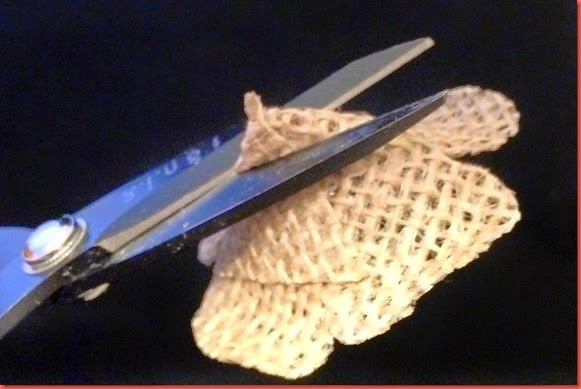
Do the same thing as you did to flower #1, EXCEPT turn it over and snip the bottom so you have a gaping hole in it.  Remember to save the heart for later.
 

IMG_2301

Snip Snip!

IMG_2308

Remember to roll your petals down.

On the back side of flower #2, put some hot glue all round the gaping hole. 

It was so dern hard to put the glue on, keep it hot, snap a photo with the other hand and NOT show you those ugly nails….

Sit the second flower down into flower #1, off sitting the petals.  I take a skewer and push all around to make sure its down nice and tight.

IMG_2309

Ah, reward……..it’s starting to come together!  WhoooHoooo!

IMG_2311

hum…wine must have gotten to me…and you…it’s really not blurry…it’s the wine…..

Do the same thing to flower #3, as you did flower #2.  Notice it only has three petals.

Take your saved piece and cut 4 petals…  Save it and flip flower #3 over put hot glue all around the outside and press it into your budding rose….offsetting the petals.

IMG_2316

Who’s fingers are those anyways?

Ok, now it get’s a bit hard to explain.  Take the saved piece that has 4 petals.  Roll it tightly up and release it.  This softens the burlap and breaks it down a bit.

Put Hot glue on the edge and roll it up again.  You are making the inner petal.

IMG_2319

Take your last saved piece that looks like a heart, soften it a bit and glue it to the outside of the other inner petal.

IMG_2322

Here is something I do that’s a bit different.  I take that inner piece, and place it in the flower we have built so far.  In my opinion the inner petal is standing up to high

IMG_2323

So, I cut the tip off.  I sit it back in the flower and it looked great, so next I filled up the gaping hole with hot glue well, not full, but was generous.

Place the inner petal into the center…..hold it for a bit till the glue hardens.  It will release from how you rolled it…that’s ok.

01eca9ba8eeb78d23f95546d650de9a079921f18c101fdfa23579721977569998b63048a66de975dc0520187462269055cda4e7d9966c7e4131685cd26311e

YOU did it!  Whew!

After I did two of them, I no longer have to look at my notes!  It’s really quite simple, and comes together quickly…not counting prepping the burlap that is!

Ok, next blog post will be how to cut burlap on an electronic die cut machine, God willing!

How to make a Burlap Rose–Part 1

How to prepare burlap for die cutting
How to Die Cut Burlap – Part 2 
My Journey trying to cut burlap on my Pazzles – Part 3

IMG_2285

I think, I am late in the game of Burlap!  Funny, loosely woven burlap has traditionally been used for sacks.  I am going to guess that not many years ago, my ancestors used burlap for clothing, or at least that was the stories told along with no shoes to walk in the snow to school.

IMG_2279

If you follow my blog, you know that I am a CASE’D crafter!  “Copy and Share Everything”  My burlap flower was inspired by Lorinda’s video.  My Burlap Rose just made this weeks favorite on Splitcoaststampers for the week ending July 20, 2014. 

IMG_1236

So, enough rambling, I will grab another cup of coffee and tell you what I learned!

Lorinda’s video will teach you how to create the rose.  If you have never cut burlap before, you are going to be in for a surprise…not a good surprise, but a surprise…the dern stuff is so crooked on the edges…it’s impossible to cut straight.  Take a look at this and come right back.  I will go get another cup of coffee.

IMG_2235

Ok, now that you have an idea how to cut the burlap these are the tools you will need.

  • Sizzix’s Flower Layers #5
    • Sizzix is out of stock, however I did find mine on ebay.
  • Burlap
    • Wallmart, Joannes, Michaels sells this at about 2.99 to 1.99 a yard.  A yard will make a lot of flowers!    You will need three 3.25” Square’s. If you only want to make a few 1/8 of a yard will do.  You can click on the photo and it will take you to this calculator.

image 

  • Mod Podge
    • Any kind will do…Elmer’s would do.  I even used Liquitex Matte Gell.  What ever you choose to use mix it 1:1 with water. I used a plastic shoe box to mix and dip in.
  • Clothes Pins
  • Clothes Hanger
  • Sicissors
  • Pokie tool thing (this is what I use, you can use a paper clip opened up or a needle)  hum, pokie tool thing?  I guess it’s a dentist probe…not liking the sound of that, I will keep it at Pokie tool thing.

Ok now that you have gathered all your things, it’s time to cut your burlap.  Make sure you take a peek at this, if you have never cut burlap before.

Since you are going to be cutting the large image three times, no need to waste your burlap.  I pulled a thread every 3.25 or 3.5 inches across the short side of the fabric. 

Once you have your strips it’s time to mix up your glue.  You don’t have to be exact…just eyeball it and mix it with 50% water in your plastic shoe box.

Take your strips and dip them in their…oh WAIT…..I had to do this outside, close to my garbage can because it’s going to drip like crazy. 

IMG_2291

Really wishing I had a clothes line at this point…Now, the card I posted above, I did that bunch of burlap by dipping into the glue and squeezing it out and then hanging it…oh my gosh….yes, it worked, yes, it dried faster, yes, I used way less glue but holy heck Batman, I had to iron it, and iron it again with steam…it was 106 that day and I swore I would NEVER do that again!  Glue is cheep…Air Conditioning not so…

Notice how straight my burlap is….Smile  no ironing this way!

I pour my glue back into the glue container and use it again .

Ok this next step you can do or not…I prep my burlap before I need it, and it would not surprise me if I had a bit of OCD going on.  I trim up my edges.  This makes the next step way easier, if you are concerned with saving burlap, because you can see the edges clearly.

IMG_2232

Ah, come on now, aren’t you impressed with how that burlap feels?  Wait until you cut it girlfriend!

That’s all for today folks!  Get your burlap ready and I will see you on the next blog post – Topic – Cutting stiffened burlap on a big shot.  Oh and after that, God Willing, how to cut burlap on an electronic die cutter….

….pssssst….if you took the time to read this and I took the time to write this, please leave me a comment!  It’s the only way I know, if anyone reads them.  It encourages me to write again.  Let me know if you enjoy/or not, my postings.