Come out, come out where ever you are! Ollie Ollie Oxen Free!
I attended a card class taught by Karen Angel and really had a wonderful time.
Karen asked for my blog site, and THEN I remembered, I had not blogged since April! So, Ollie Ollie Oxen Free, come on back to home base! I had not been in my studio since April!

Yeppers, those my friends are dust bunnies! Oh My, can a craft studio get very dusty! All those little tiny things…covered in dust!
Prior to my sabbatical, I was moving my old scrap ribbon storage over to wrapping on round clothes pins and placing into a Ribbon Jar. Found a pile of ribbon and added it to my ribbon jar. Of course, I believe in CASE! (CASE = Copy and Share Everything). Inspiration came from Papertrey Ink and Nichole Heady! Next time I am at a thrift shop, I will be looking for a beautiful glass jar!


Have you ever took a sabbatical from crafting? I have NEVER done this for 5 months! Have no idea what was up with that!
So, after chasing down all the dust bunnies I found myself starting my Christmas cards. As you can see, I have dusted off my big shot and have some of my pieces done. Waiting on some Inka Gold to come in. I will blog the finished card when I finish them…Yeppers, I will finish these babies!

So, I had to find another project while waiting for snail mail…looked around there was a pile of notebooks I had never done anything with….hum, I thought! These would be great for small gifts.


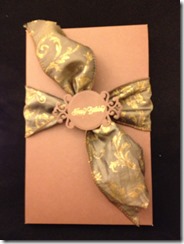
I am loving Stamping Up’s Secret Garden Stamp set. CASE was from Brandy! with my tweak adding a gift box. Now the brown box is the Exact same card stock as the notebook…I must have turned on my flash!
Oh, one last thing to add to my unfinished projects. Magnetic book marks.


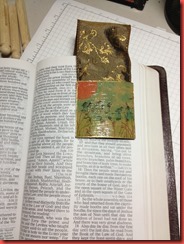
This was really creative fun for me. I took some scrap cardboard and grabbed my distress stain daubers.
I punched out a 1 3/4 circle and used the negative to mask with a yellow/orange sun. Then I masked off the sun and started laying my color for a sky, water and grass. I wanted a watercolor effect and this technique worked really well. After stamping I sealed with modge podge, dried and glued magnets on the back, added ribbon. All using scraps! Gotta love using scraps!
Well there you have it! I have found my MOJO again!


![clip_image001[6]](https://blogger.googleusercontent.com/img/b/R29vZ2xl/AVvXsEhtu-ker2TPw1PcjrYiGELC3BsUXN6g8HIOaJbj3Q4nfMsFmyg37xoF9RnL64U77QFlnWB3iD0m2Inw3inhyaiR8Hh0oFd5rIoFBWqyeLxDjTCOhImwG53k4F8ouxPmVClb00AkWwqaX0g/s1600-h/clip_image001%25255B6%25255D%25255B2%25255D.jpg "clip_image001[6]")


![clip_image001[4]](https://blogger.googleusercontent.com/img/b/R29vZ2xl/AVvXsEhlMB-jOMcmLA5HP82IYOkJpz8LtFXhPYotfbPd3u1Nbt6mu36-v1nj04RhUhN6jrghN5dsRtRALNSyyLqeL-ImpFNl5ZN04GzruTtqj__MzXbaBTh2nMKrlX14LKi0kYY_1dpf436GmWo/s1600-h/clip_image001%25255B4%25255D%25255B2%25255D.png "clip_image001[4]")
![clip_image001[6]](https://blogger.googleusercontent.com/img/b/R29vZ2xl/AVvXsEgipDHpacdu_wJSPG09S-SYjDkPvh-NQM9KWi6-Y3aLi13pGY88PR1EEqNfz9ohWYcMH2bsyjSbFOC7lyq78UCSYciTHisDEqiniLZTFHZhM9GgLmUccMkxA-3GLKnDJti1raoLides6cQ/s1600-h/clip_image001%25255B6%25255D%25255B2%25255D.png "clip_image001[6]")
![clip_image001[8]](https://blogger.googleusercontent.com/img/b/R29vZ2xl/AVvXsEie5W6yQrHoPdEENHwlJxOinyu_Cms1uS1KQSCquCeM68v4oRmga3bLz14rfR_GSltt8JvOYL9IW-orvi1WrEm8fAZ92ZhIURj3oRQCC_i7e-aRFurrOJc8bk6tNNkMY6sH_vyLVgbQWKs/s1600-h/clip_image001%25255B8%25255D%25255B2%25255D.png "clip_image001[8]")
![clip_image001[10]](https://blogger.googleusercontent.com/img/b/R29vZ2xl/AVvXsEgiHKtFS29nM89hi1XLK1vOcgnykaQFRtj-1uFQmGga0lHBhtlFSMM_tzuz3f-5iGjcXyMBqBRx6HYJqDmddVyA6Qt9eHNyAv2Uq71mwIw2jelyI5n23A8jHgBbBQ41IgX0vcOZkz4o9Zg/s1600-h/clip_image001%25255B10%25255D%25255B2%25255D.png "clip_image001[10]")
![clip_image001[12]](https://blogger.googleusercontent.com/img/b/R29vZ2xl/AVvXsEiH8cZF4vxrlDgfk1pzUGhBqc_QWFkvtQZRqoFpGglNyN3IFox8Oy4Wv8tjwemb3Lg5TxHblIH4jXzCh6OtqlKtAAsERQUCXRANkA7jK5vzmE2aabbueePaAUSXAxNQd8tHYASSfnghK7g/s1600-h/clip_image001%25255B12%25255D%25255B2%25255D.png "clip_image001[12]")
![clip_image001[14]](https://blogger.googleusercontent.com/img/b/R29vZ2xl/AVvXsEhe30g3tYj66Q4jHrTUUnIE9sHvTngjfyTAy0kSPTX24GBH6Eyrbxr10-BWsE9Ocgt1LrqKKwKabUsGP3eNalwTV27BtKnpGe03Z1-YC3jWAPyX_mvbsaybhhYIK4i_AyjJnHE522aDY7s/s1600-h/clip_image001%25255B14%25255D%25255B2%25255D.png "clip_image001[14]")
![clip_image001[16]](https://blogger.googleusercontent.com/img/b/R29vZ2xl/AVvXsEhMVZo-Lyi7fz9rP7nZ4269-g2_VUllNjNVHE7bV3rmEm78emv1Wk5wjeONPLx-4XFAtIwUEhmSnN1gzl4LqETpCpo9NNCrgFSPWGBNfD3G6s6uRLUKY5_gchal1GZ9_wztws-2qyltBQg/s1600-h/clip_image001%25255B16%25255D%25255B2%25255D.png "clip_image001[16]")
![clip_image001[18]](https://blogger.googleusercontent.com/img/b/R29vZ2xl/AVvXsEiuDhM8Z4XAXauuaB06D1ZVmX_w196qoYwJjIXzNFImCKM4Wo4-wTaCOZZ7MrB-PdvYpJXAbWW9cXZ9y2G1vpYrwFQ5oOzaQJhwdFprEwdcehWBFixWZKYXz2twHqoPyVsxY3kQBNQnL7E/s1600-h/clip_image001%25255B18%25255D%25255B2%25255D.png "clip_image001[18]")
![clip_image001[20]](https://blogger.googleusercontent.com/img/b/R29vZ2xl/AVvXsEjMHa0titcRXhrNKUSKwz3oA3-rkc7oh1RMXLYemUCSVq1pnOnjNnQW4wQKVN_ayQ_FWJi3WjxR6d7xVut5RdPmLwpVJTo0XJv7F8GE6Zdwo-QzZQXVL8eNigNKF4sW6fZSvUXgmnARZpA/s1600-h/clip_image001%25255B20%25255D%25255B2%25255D.png "clip_image001[20]")
![clip_image001[22]](https://blogger.googleusercontent.com/img/b/R29vZ2xl/AVvXsEg_KGdqAInvf5vNCfGesCJXMED31dZZGxxKznOtM3tDJGJGpH9ZueHDOrTfODn_NGIJWtSiTxzAX_NSteyu85QNZZT6X6kd7ddQvy0HjthsI45oE86rI26W9yboriusfqsvRwvtGrfeMKQ/s1600-h/clip_image001%25255B22%25255D%25255B2%25255D.png "clip_image001[22]")
![clip_image001[24]](https://blogger.googleusercontent.com/img/b/R29vZ2xl/AVvXsEhJunD09_5Fqpy7FCHjCWckxU7QnnIe_JewFMbwm4ifM045HT-CeIIKV13m9fVyfCinG0RTQRM00NeGoJBAI7W8WSZTVorKbEXT5CICEOgQtd3EEQ4J9rQ7A4lzxdJkWiMCFNkZFs-3fPI/s1600-h/clip_image001%25255B24%25255D%25255B2%25255D.png "clip_image001[24]")
![clip_image001[26]](https://blogger.googleusercontent.com/img/b/R29vZ2xl/AVvXsEiOk-SnUHTEWsun2eW3SjBwm1FAz6X0tdr_tavd1CPLDetk6xR4Xvq9fKs4fSZDpG1oAG6i1YgXhqPxhd_H65knyHqEZJVCzNmBpKA7KApBuqoBY18TFMs3RZIP1mIG45Ofjw0avBFhDJ8/s1600-h/clip_image001%25255B26%25255D%25255B2%25255D.png "clip_image001[26]")
![clip_image001[28]](https://blogger.googleusercontent.com/img/b/R29vZ2xl/AVvXsEhibAHMR1eol8tSIuuxlNLLVmzo8W8pDDdRkgaMNLwpzQTc4dICmk3LJdZVjQJk24h9nNIcbN1QvqDtkFPWCGFaqBxeolmhCUjo65X8dfSD5RVslc3APt2ZfJe23htqLr7VrjRcBvQTEy0/s1600-h/clip_image001%25255B28%25255D%25255B2%25255D.png "clip_image001[28]")
![clip_image001[30]](https://blogger.googleusercontent.com/img/b/R29vZ2xl/AVvXsEj1HeY9hNfZZmAXlEkeO6yNXcnUisI3ZXVoF1eHWY0oNLrBfIsQHUDY9yA9mroxtkeht1hLNEy2WS6iUO-RCQLpM0hLYOXzbMU4W1dT-bYTmLTNfGjau-o0CeihKoKudj5rwGfSp92gM1I/s1600-h/clip_image001%25255B30%25255D%25255B2%25255D.png "clip_image001[30]")
![clip_image001[32]](https://blogger.googleusercontent.com/img/b/R29vZ2xl/AVvXsEjz8nsaX0jttaHELn-2udsqdo2Iiy8UAkoMUewG_j06d1w0vUWU3L8MkcNjgg-XipWpcSXkH-jlTttFPrDXStiZ-gOX4FXxVhrxMG9HxfWc90Ps_GtXIfOYbi6DVp_zIevQOQEbMa9MeIc/s1600-h/clip_image001%25255B32%25255D%25255B2%25255D.png "clip_image001[32]")